
A Step-by-Step Guide to Visualizing Braces Using Photoshop
Photoshop, the powerful image-editing tool from Adobe, has made it possible for everyone to alter their appearance virtually in a myriad of ways. If you’re considering braces but are apprehensive about how they might transform your smile, Photoshop provides the perfect solution. By following a simple step-by-step process, you can preview what you’d look like with braces.
First, let’s outline the materials and tools required:
- Adobe Photoshop (any version from CS6 onward);
- A high-resolution, close-up photograph of your smile;
- Image of braces (sourced from the internet or a dental catalog).
Step-by-Step Process
Preparation
To prepare your photograph in Photoshop, follow these detailed steps:
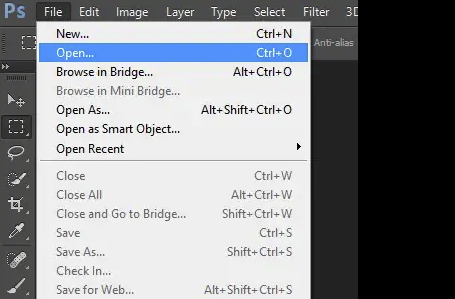
- Open Image: Launch Photoshop and locate your chosen photograph. Select ‘File’ from the menu, then choose ‘Open.’ Browse to the image location and click on it to open it in Photoshop;
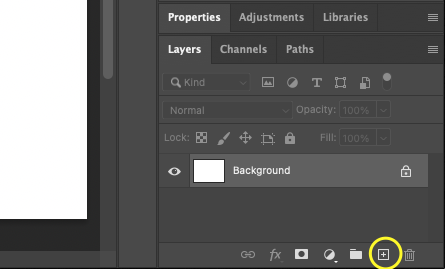
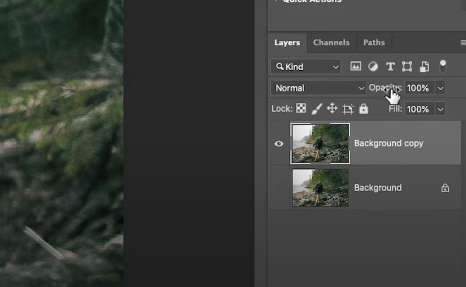
- Create a New Layer: After opening your image, it’s a good practice to work on a new layer to keep your original image intact. Go to the menu and select ‘Layer,’ then choose ‘New’ and click on ‘Layer.’ Alternatively, you can use the shortcut ‘Shift+Ctrl+N’ on a PC or ‘Shift+Command+N’ on a Mac to create a new layer quickly.
Selection of Teeth
To make a selection of the teeth in Photoshop, follow these steps:
- Zoom In: Use the ‘Zoom’ tool from the tools panel or press ‘Z’ on your keyboard. Zoom in on the teeth area to get a closer view and better visualization for selecting the teeth accurately;
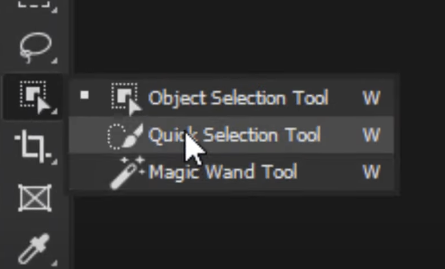
- Selection: Choose the ‘Quick Selection Tool’ from the tools panel or press ‘W’ on your keyboard to activate it. Begin selecting the teeth by clicking and dragging over the desired area. If the tool selects more than necessary, you can use the ‘Subtract from Selection’ option in the options bar at the top of the screen. This option allows you to remove unwanted areas from the selection by clicking and dragging over them.
Adding Braces
To add braces to your image in Photoshop, follow these steps:
- Open Braces Image: Start by opening the image of the braces in Photoshop. You can do this by following the same steps mentioned in step 1 of the previous instructions;
- Select Braces: Activate the ‘Quick Selection Tool’ from the tools panel or press ‘W’ on your keyboard. Use this tool to carefully select the braces in the braces image. Click and drag over the braces to include them in the selection. If needed, you can use the ‘Subtract from Selection’ option in the options bar to remove any unwanted areas from the selection;
- Copy and Paste Braces: Once you have made the selection of the braces, go to the menu and select ‘Edit,’ then choose ‘Copy’ to copy the selected braces. Now, switch back to your original image (the one with the selected teeth) and paste the braces onto it. To do this, go to ‘Edit’ > ‘Paste’ in the menu. The braces will be pasted as a new layer on top of the selected teeth.
Braces Adjustment
To adjust the braces after pasting them onto the selected teeth in Photoshop, follow these steps:
- Positioning: Once you have pasted the braces, they will be on a new layer above the selected teeth. Click on the braces layer to select it. Then, go to the menu and choose ‘Edit,’ followed by ‘Free Transform.’ Alternatively, you can use the shortcut ‘Ctrl+T’ on a PC or ‘Command+T’ on a Mac. This will activate the transformation handles around the braces;

- Size Adjustment: To adjust the size of the braces, click and drag any of the corner handles while holding down the ‘Shift’ key. This ensures that the aspect ratio of the braces is maintained while resizing. Move the handles in or out to make the braces larger or smaller, respectively, until they fit well over your teeth;
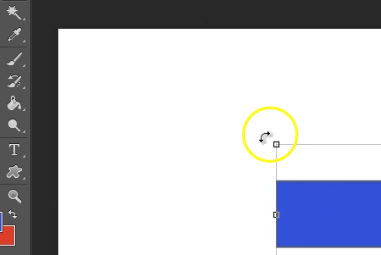
- Rotation: If necessary, you can rotate the braces to align them properly with the angle of the teeth. Hover your cursor just outside one of the corner handles until you see a curved double-sided arrow. Click and drag in a circular motion to rotate the braces to the desired position.
Fine-Tuning
To fine-tune the appearance of the braces on your teeth in Photoshop, follow these steps:
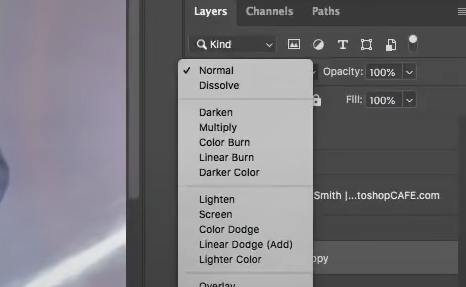
- Layer Blending Mode: Select the braces layer in the Layers Panel. Then, locate the Blending Mode dropdown menu at the top of the Layers Panel and choose either ‘Multiply’ or ‘Overlay’, depending on the color of your braces and teeth. This blending mode helps the braces blend more naturally with your teeth by adjusting the way the colors interact;
- Layer Opacity: Adjust the Layer Opacity in the Layers Panel to make the braces look more realistic. Reduce the opacity to a value between 75% and 85% to create a subtle effect that mimics the transparency of actual braces. You can find the Opacity slider in the Layers Panel, allowing you to fine-tune the visibility of the braces layer;
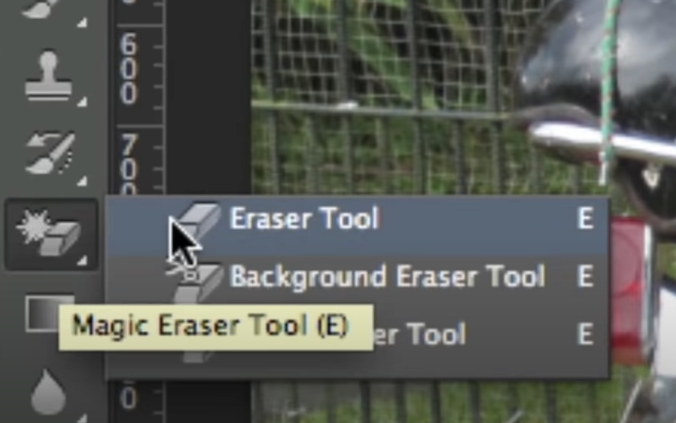
- Eraser Tool: Select the ‘Eraser’ tool from the tools panel or press ‘E’ on your keyboard to activate it. Adjust the brush size and hardness as needed. Use the Eraser tool to carefully clean up any unwanted parts of the braces layer that overshoot your teeth or extend beyond the desired areas. This step ensures a precise and seamless integration of the braces with your teeth.
Tips for a More Realistic Outcome
While the above steps will give you a basic idea of what you would look like with braces, a few additional tips can enhance the realism of the final image:
| Adjustment | Steps |
|---|---|
| Lighting Adjustment | Use ‘Image’ > ‘Adjustments’ > ‘Brightness/Contrast’ or ‘Levels’ to match the lighting of the braces with your original image. |
| Color Adjustment | Similarly, use ‘Image’ > ‘Adjustments’ > ‘Hue/Saturation’ or ‘Color Balance’ to match the color of the braces with the reflections on your teeth. |
| Blur | If the braces look too sharp compared to your teeth, apply a slight ‘Gaussian Blur’ (‘Filter’ > ‘Blur’ > ‘Gaussian Blur’) to the braces layer. |
| Warp Transformation | If the braces don’t perfectly align with the perspective of your teeth, use ‘Edit’ > ‘Transform’ > ‘Warp’ to bend the braces image so it matches the curvature of your teeth. |
Conclusion
Photoshop is a powerful tool that can provide a realistic preview of your appearance with braces. This guide offers a straightforward way to visualize the changes braces might bring, thereby helping you make an informed decision.
Remember, while Photoshop can create a good approximation, it may not perfectly represent the final result, as the actual outcome depends on various factors, including your orthodontist’s expertise, the type of braces, and your specific dental needs. Always consult with a dental professional before making any decisions regarding your oral health.
This guide provides a basic overview. Photoshop is a feature-rich program with numerous tools that allow for endless possibilities. As you become more comfortable using Photoshop, you can explore more advanced techniques to enhance your image editing skills.