
Creating a Circular Artboard in Illustrator: A Step-by-Step Guide
Harnessing the power of a circular artboard in Adobe Illustrator is contingent upon your distinct needs and personal inclinations. This versatile feature proves invaluable when undertaking circular or rounded projects, or when aiming to showcase artwork within a specific shape.
Within the confines of this article, we will illuminate the process of crafting a circular artboard in Adobe Illustrator, accompanied by a trove of valuable insights and techniques to amplify the impact of your designs.
Why Should You Create a Circular Artboard in Adobe Illustrator?
When it comes to Adobe Illustrator, the option to create a circular artboard opens up a world of possibilities tailored to your design requirements. Let’s explore some compelling motives for opting to utilize a circular artboard:
- Circular or rounded designs: If your project demands a circular or rounded composition, a round artboard provides a visual framework that aligns with your design’s shape. By immersing yourself in this circular space, you can intuitively grasp the arrangement and spatial relationships within your design;
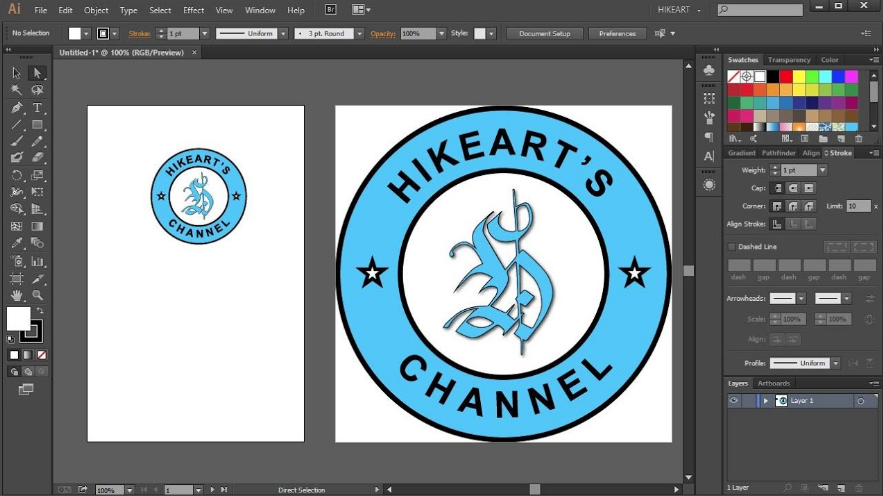
- Round logos or emblems: When crafting logos, emblems, or circular graphics, a round artboard proves especially advantageous. By aligning the artboard shape with the intended logo or emblem, you can seamlessly work within the boundaries of the final output, fostering precision and coherence;
- Layouts and presentations: When creating layouts or presentations featuring circular designs, employing round artboards elevates the visual authenticity of your showcase. By accommodating the roundness of your design, you can present your work in a realistic and aesthetically accurate manner, particularly if the end result is meant to be circular;
- Web and app icons: Round artboards find common usage in the design of web or app icons. Given the prevalence of circular borders in digital interfaces, adopting a circular artboard allows you to directly visualize how your icon will appear in its intended environment. This facilitates seamless integration and enhances the overall user experience;
- Visual experimentation: By embracing diverse artboard shapes, such as the circular variant, you can invigorate your creative process and unlock innovative designs. Breaking away from conventional rectangular constraints, circular artboards provide a fresh perspective that stimulates creativity and inspires novel design approaches.
Adopting a circular artboard empowers you to work within a circular space while capitalizing on the comprehensive suite of tools and features offered by Adobe Illustrator.
How to Create a Circular Artboard in Adobe Illustrator
While Adobe Illustrator doesn’t have a specific feature for circular artboards, you can achieve the illusion of a circular artboard by following these simple steps:
- Launch Adobe Illustrator and create a new document by clicking on File > New or using the Ctrl/Cmd+N shortcut;
- In the New Document dialog box, enter the desired dimensions for the artboard. Keep in mind that the artboard shape will remain rectangular, but we’ll create a circular shape within it. For instance, you can set the width and height to the same value to create a square-shaped artboard.
- Click OK to create the new document;
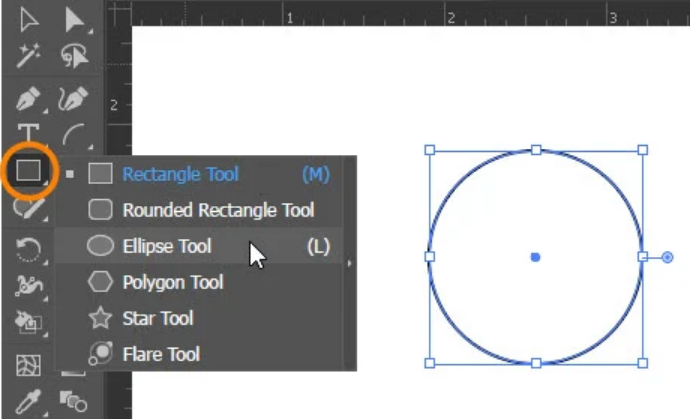
- Select the Ellipse tool from the toolbar on the left side of the screen, which is represented by an ellipse or circle icon;
- Press and hold the Shift key, then click and drag the tool on the artboard to create a perfect circle. Holding Shift ensures that the width and height of the shape remain equal. Adjust the size of the circle to fit within the rectangular artboard;
- Release the mouse button to finalize the circle’s size. If you prefer to specify exact dimensions, you can click once on the artboard, enter the desired dimensions in the dialog box that appears, and click OK;
- Align the circle at the center of the artboard using the Align panel. If the Align panel is not visible, go to Window > Align. With the circle selected, click on the Align Horizontally Centered and Align Vertically Centered buttons in the Align panel;
- Ensure that the circle is positioned on top of the artboard by going to Object > Arrange > Bring to Front;
- To remove the stroke and fill of the circle, select it and set the fill and stroke colors to None or Transparent in the Control panel or Color panel.
Congratulations! You now have a circular shape within a rectangular artboard, giving the illusion of a circular artboard.
Remember, when exporting or saving your artwork, only the contents within the rectangular artboard area will be saved. Anything outside that area will not be included in the final result.
Locating the Frame Tool in Adobe Illustrator
In Adobe Illustrator, the Frame tool provides a convenient way to create frames that can be filled with images. Here’s how you can access the Frame tool:
- Select the Frame tool by pressing the “K” key on your keyboard;
- In the Options panel, look for the icon representing an elliptical frame and click on it;
- Now, you can draw a frame on the canvas by clicking and dragging;
- To populate the frame with an image, drag an image from the Library panel or your local computer drive directly into the frame;
- The placed image will automatically be scaled to fit within the frame, and the frame itself will act as a border, effectively masking the image.
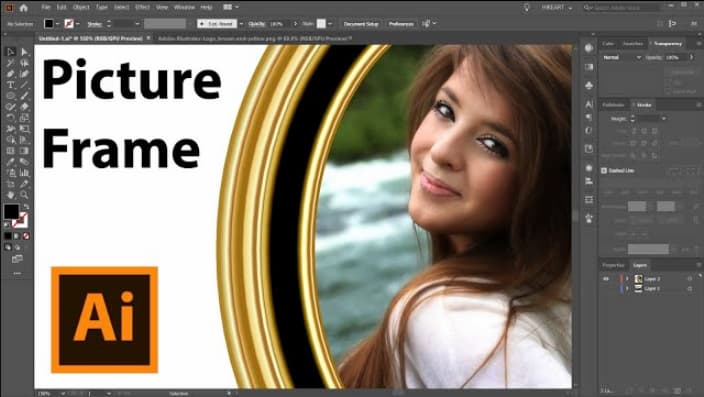
Transforming an Image into a Circular Shape
If you want to transform a picture into a round shape in Adobe Illustrator, you can utilize a clipping mask. Follow these steps to achieve the desired effect:
- Open Adobe Illustrator and create a new document or open an existing one;
- Place the image you wish to convert into a circular shape by going to File > Place and selecting the image file from your computer. Click “Place” to insert it into the document;
- Select the Ellipse tool from the toolbar on the left side of the screen. It can be identified by its ellipse or circle icon;
- While holding down the Shift key, click and drag the Ellipse tool on the artboard to create a perfect circle. Adjust the size of the circle to match the desired rounded shape;
- Click on the circle to select it, then hold Shift and click on the placed image to select both objects. Ensure that the circle shape is on top of the image;
- With both objects selected, go to Object > Clipping Mask > Make, or use the Ctrl/Cmd+7 shortcut. This action will mask the image within the boundaries of the circle, transforming it into a circular shape.
If necessary, you can further adjust the position and size of the circular image by selecting the entire clipping mask (clicking on the edge of the circular image) and using the selection tool (black arrow) to move or resize it.
By following these steps, you can effectively create a circular image using a clipping mask in Adobe Illustrator. Remember to save your work regularly to avoid losing any changes you’ve made.
How Do Transform the Canvas Shape in Adobe Illustrator
Unlike some other design programs, Adobe Illustrator does not provide a direct option to change the shape or size of the canvas. In Illustrator, the canvas is referred to as an artboard and is always rectangular, without the ability to be morphed into different shapes. However, you can achieve a similar outcome by following these steps:
- Select all the artwork on the artboard: Utilize the Selection tool (black arrow) or press Ctrl/Cmd+A to choose all the objects present on the artboard;
- Group the selected objects: Right-click on the selected objects and select the “Group” option from the context menu, or press Ctrl/Cmd+G as a shortcut. Grouping the artwork allows you to handle it as a single object;
- Generate a new shape: Utilize shape tools such as the Rectangle or Ellipse tool to create a new shape that matches the desired form of the “canvas.” For instance, if you desire a circular “canvas,” employ the Ellipse tool to craft a circle;
- Position the new shape: Move the created shape to the desired location on the artboard, ensuring that it covers the entire area you want to retain;
- Arrange the new shape: With the new shape selected, right-click on it and select “Arrange” > “Send to Background” from the context menu. This action ensures that the new shape is positioned behind the grouped artwork;
- Apply a Clipping Mask: With both the new shape and the grouped artwork selected, navigate to Object > Clipping Mask > Make or use the Ctrl/Cmd+7 shortcut. This step masks the grouped artwork within the boundaries of the new shape, effectively altering the visible area.
It is important to note that this technique solely affects the visibility of the artboard within the specified shape. The artboard itself remains rectangular, and any objects outside the new shape will not be visible when saving or exporting the file.
If you wish to resize the actual artboard, you can access the option by going to File > Customize Document and adjusting the dimensions accordingly.
To prevent losing any changes, remember to save the file regularly. Additionally, be aware that modifying the size or shape of the artboard may impact its proportions or necessitate adjustments to preserve the intended design.