HOW TO REMOVE THE BACKGROUND OF IMAGES IN FIGMA
Removing the Background from an Image in Figma isn’t just possible; it’s a skill that can greatly enhance your design abilities. Similar to cropping a photo using custom shapes, you can completely eliminate the background from an image.
However, before embarking on this process, there are some important factors to consider.
Understanding Image Quality
It’s important to grasp that the success of background removal depends on image quality. This principle applies not only to Figma but also to other graphic editing programs.
To achieve the best results, the object you intend to extract from the image should have clear edges, be well-focused, and possess distinct lines. The best outcomes come from clear images without blurriness and fine details like hair.
Step-by-Step Guide: Effortless Background Removal
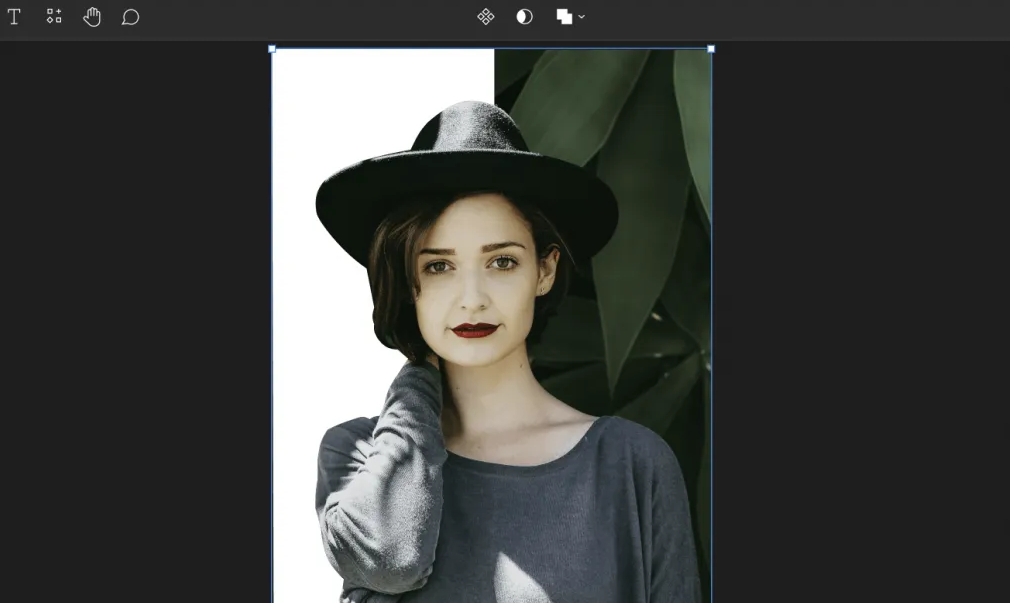
Import and Image Adjustment. Begin by importing the image into the Figma program:
- To ensure clear edge and line visibility, reduce the image opacity by adjusting the fill opacity in the “Image Fill” section (for instance, set it to 25%). If you’re working with a dark theme, you can add a solid white shape behind the image;
- Select the “Pen” Tool. Use the “Pen” tool to outline the object you want to isolate from the background. Zoom in on the image to clearly delineate the edges;
- Start Tracing from the Bottom. Commence outlining from the lower part of the image. Place the first point at the end of a curve or where it intersects with another element. For instance, when outlining a person, start with a prominent edge like a shirt fold. Determine point placements as you work, refining this skill with practice. Try not to clutter the path with unnecessary points;
- Master the “Corner Node” Technique. To ensure precise tracing without unwanted bends, employ the “corner node” technique. When creating a point, hold down the (Alt) key after aligning the edge with the handle. This prevents unwanted bends in the subsequent node;
- Trace the Entire Image. During the process, you might need to move the viewport due to perspective adjustments. Press the (Space) key to drag the viewport. Continue tracing until you complete the vector path, returning to the initial point;
- Edit the Traced Vector. To refine areas that aren’t satisfactory, select the drawn vector and click the “Edit Object” button. While holding the Ctrl key, switch to the “Bend” tool for precise adjustments. Release (Ctrl) to move nodes or handles. Confirm edits using the (Enter) key or the “Done” button;
- Fill the Vector and Apply a Mask. Choose a fill color for the completed vector and place it in the background (using brackets or the layer stack). If you added a shape with a white background, delete it. Select the image and vector, then click the mask icon or use the (Ctrl Alt M) key combination to create a mask.
Congratulations! You’ve successfully removed the background from an image using only Figma — no plugins required. While practice will make this process smoother, you’ve gained skills transferable to other programs like Photoshop or the freely available Inkscape.
In Conclusion
By completing these steps, you’ve gained valuable skills that can significantly enhance your design projects. If you have any questions or ideas on other topics, feel free to leave your comments below.

To sum it up, mastering the art of background removal in Figma isn’t just a technical skill; it’s the key to unlocking a world of creative possibilities. While this process might seem complex and demanding initially, the rewards in terms of design flexibility and experience make the effort entirely worthwhile.
Here’s a brief overview of what you’ve learned and why it matters:
- Image Quality Matters: You’ve understood that the quality of the image you work with is paramount. Sharp, well-defined objects with clear lines yield the best results when removing backgrounds. This notion reminds us that the foundation of any design task lies in the quality of the materials used;
- Precision with the Pen Tool: Meticulous use of the “Pen” tool proved to be the linchpin of success in this endeavor. The ability to precisely place nodes and trace edges determines the outcome. This skill not only aids in background removal but also opens doors to solving other vector design challenges;
- Corner Node Technique: Incorporating the “corner node” technique provides an invaluable tool for achieving clean and accurate contours. This technique not only enhances the workflow in Figma but also deepens your understanding of vector principles that underlie many design programs;
- Scaling and Editing Flexibility: The mastery of scaling and editing hand-drawn vectors demonstrates adaptability and attention to detail. These qualities can be employed across various design realms where focused attention and detail work are pivotal;
- Vector Fill and Masks: The stages involving vector fills and mask applications underscore Figma’s capabilities. This knowledge not only assists in background removal but also allows for exploring more intricate design methods within the Figma ecosystem;
- Transferable Skills: Perhaps one of the most gratifying aspects of this journey is realizing that the acquired skills extend beyond Figma. Proficiency in working with vectors, outlining edges, and managing curves can be easily transferred to other standard design tools like Photoshop or Inkscape;
- Unlocking Creative Potential: Successfully mastering background removal has unlocked your potential to reimagine design without being confined to the context of the original image. The newfound creative freedom enables the exploration of new narrative approaches and visual communication;
- Continual Learning: The emphasis placed on practice in the article, coupled with the understanding that perfection comes with time, nurtures a growth mindset. Design, like any craft, thrives on continuous learning and refinement. This skill set lays the foundation for your ongoing development in the design world.
Essentially, through this comprehensive guide, you’ve acquired a specialized skill that reaches far beyond a single technique. It opens doors to a broader understanding of design principles, vector work, and a creative approach to problem-solving.
As you move forward with your design endeavors, remember that background removal in Figma was just the beginning of your exciting design journey. Having mastered this task, you’re on the path to becoming a more versatile and skilled designer.
Thank you for dedicating your time to mastering background removal in Figma!