Harnessing the Power of WordPress Lightbox 2
WordPress has revolutionized the way we create and manage content on the web. Among its myriad features and plugins, WordPress Lightbox 2 stands out as a powerful tool designed to enhance the presentation of images and videos on a webpage. This article will delve into the nuts and bolts of the WordPress Lightbox 2 plugin, its benefits, and how to effectively utilize its features.
Understanding Lightbox 2
Lightbox 2 is a WordPress plugin that offers an intuitive and immersive way to display images and videos on your website. Instead of opening in a new tab or redirecting the user away from the page, media files open in an overlay or “lightbox” that dims the rest of the webpage, allowing the user to focus solely on the media content. This plugin supports various media types, including:
| Format | Description |
|---|---|
| JPEG | A common image file format that uses lossy compression to reduce file size while maintaining decent quality. |
| GIF | An image file format that supports animation and uses a limited color palette, often used for short looping animations and memes. |
| PNG | A lossless image file format that supports transparency and is commonly used for web graphics and digital images. |
| YouTube | A popular online video-sharing platform where users can upload, watch, and share videos. |
| Vimeo | A video-sharing platform that focuses on high-quality and professional content, providing tools for creators and a curated experience for viewers. |
| Flash videos | Videos created using Adobe Flash technology, often used for web-based multimedia content but now largely replaced by more modern video formats like HTML5. |
Advantages of Lightbox 2
Utilizing Lightbox 2 on your WordPress site offers several significant advantages:
- Improved User Experience: Lightbox 2 enhances user interaction by providing a focused and intuitive media viewing experience, allowing users to easily zoom in and out, adjust brightness, and even add annotations to images or videos;
- Responsive Design: The plugin is fully responsive, ensuring images and videos adapt and display correctly on all devices, whether it’s a desktop computer, tablet, or smartphone;
- Easy Navigation: Lightbox 2 allows for seamless and intuitive navigation through galleries with the use of arrow keys on keyboards or swipe gestures on touch devices, providing a smooth and enjoyable browsing experience;
- Customizability: Lightbox 2 is highly customizable, offering a wide range of options to personalize its appearance and functionality, such as choosing different themes, adjusting transition effects, and even adding custom CSS styles to match your website’s branding.
Installation and Configuration of Lightbox 2
Follow the steps below to install and configure the Lightbox 2 plugin on your WordPress site:
Installation
Here are the steps for installing and activating the ‘Lightbox 2’ plugin in a 2-row table format:
| Step | Instructions |
|---|---|
| 1. | Log in to your WordPress Admin Dashboard:<br>- Open your web browser and enter the URL for your WordPress website’s admin area (e.g., https://www.yourwebsite.com/wp-admin).<br>- Enter your username and password to log in. |
| 2. | Navigate to the ‘Plugins’ Section:<br>- After logging in, you will be redirected to the WordPress admin dashboard.<br>- In the left-hand sidebar, hover over the ‘Plugins’ option.<br>- Click on the ‘Add New’ submenu. |
| 3. | Search for the ‘Lightbox 2’ Plugin:<br>- On the ‘Add Plugins’ page, you will see a search bar at the top-right corner.<br>- Type ‘Lightbox 2’ into the search bar and press Enter or click the ‘Search’ button. |
| 4. | Install the ‘Lightbox 2’ Plugin:<br>- In the search results, you should see the ‘Lightbox 2’ plugin listed.<br>- Locate the ‘Lightbox 2’ plugin and click the ‘Install Now’ button.<br>- WordPress will then download and install the plugin on your website. |
| 5. | Activate the ‘Lightbox 2’ Plugin:<br>- After the installation is complete, you will see an ‘Activate’ button.<br>- Click the ‘Activate’ button to activate the ‘Lightbox 2’ plugin.<br>- The plugin will now be ready to use on your WordPress website. |
Configuration
Here are the steps for configurating the ‘Lightbox 2’ plugin in a 2-row table format:
| Step | Instructions |
|---|---|
| 1. | Navigate to the ‘Settings’ Section:<br>- Log in to your WordPress admin dashboard.<br>- In the left-hand sidebar, hover over the ‘Settings’ option.<br>- Click on the ‘WP Lightbox 2’ submenu. |
| 2. | Configure the Plugin Settings:<br>- On the ‘WP Lightbox 2 Settings’ page, you will find various options to customize the plugin according to your requirements.<br>- Adjust the settings according to your preferences by selecting checkboxes, entering values, or choosing options from dropdown menus.<br>- Once you have made the desired changes, scroll to the bottom of the page and click the ‘Save Changes’ button to save your configuration. |
Customizing Lightbox 2
Lightbox 2 provides an array of customization options to better match your website’s aesthetics and functionality:
Overlay Opacity
The overlay opacity feature allows you to control the transparency of the overlay that appears when a lightbox is activated. This feature is commonly used in web design and image galleries to provide a focused viewing experience while still allowing some visibility of the underlying page content. By adjusting the overlay opacity, you can control the level of transparency and determine how much of the underlying page is visible.
To modify the overlay opacity, follow these steps:
- Identify the overlay element: Locate the CSS or HTML element that represents the overlay in your web design or image gallery code. This element is typically positioned above the underlying page content and is responsible for creating the dimming effect;
- Set the opacity property: Once you have identified the overlay element, you can modify its opacity property. This property accepts values between 0 and 1, where 0 represents complete transparency (invisible overlay) and 1 represents full opacity (completely obscuring the underlying page content);
- Adjust the opacity value: Determine the desired level of overlay opacity based on your design preferences and the intended user experience. Lower values such as 0.5 or 0.7 will create a partially transparent overlay, allowing some visibility of the underlying page content. Higher values like 0.9 or 1.0 will create a more opaque overlay, effectively hiding the underlying page content;
- Apply the opacity value: Assign the chosen opacity value to the overlay element’s opacity property. This can be done by adding a CSS rule or modifying the corresponding HTML attribute. Ensure that the change is applied consistently across all relevant states or instances of the lightbox.
Animation Speed
The animation speed feature allows you to customize the duration of the animation that occurs when a lightbox opens or closes. By adjusting the animation speed, you can control how quickly or slowly the lightbox transitions into view or fades away. This feature is commonly used in web design and image galleries to enhance the user experience and create smooth, visually appealing transitions.
To customize the animation speed, follow these steps:
- Identify the animation elements: Locate the CSS or JavaScript elements responsible for animating the lightbox when it opens or closes. These elements could include transitions, transforms, or animations applied to various components of the lightbox;
- Modify the animation properties: Once you have identified the animation elements, you can modify the properties that control the animation speed. The specific properties will depend on the animation technique used in your design, such as CSS transitions or keyframe animations;
- Adjust the animation duration: Determine the desired duration of the animation based on your design preferences and the desired visual effect. Longer durations create slower, more gradual transitions, while shorter durations result in quicker, more abrupt animations;
- Set the animation duration value: Assign the chosen duration value to the animation properties of the relevant elements. This can be done by adding CSS rules or modifying the corresponding JavaScript code. Ensure that the change is applied consistently across all relevant states or instances of the lightbox.
Border Size
The border size feature allows you to define the thickness of the border around your images and videos within the lightbox. By adjusting the border size, you can add visual emphasis to the media content displayed in the lightbox and enhance its overall appearance. This feature is commonly used in web design and image galleries to provide a polished and structured presentation.
To define the border size, follow these steps:
- Identify the image or video elements: Locate the HTML or CSS elements that represent the images or videos displayed within the lightbox. These elements typically contain the source URLs or references to the media content;
- Set the border property: Once you have identified the media elements, you can modify their border properties. The border property in CSS allows you to define the border style, color, and size;
- Adjust the border size value: Determine the desired thickness of the border based on your design preferences and the intended visual effect. You can choose a specific pixel value or use relative units like em or percentage to ensure responsiveness;
- Apply the border size value: Assign the chosen border size value to the border property of the media elements. This can be done by adding CSS rules or modifying the corresponding HTML attributes. Ensure that the change is applied consistently across all relevant instances of the lightbox.
Autosizing
The autosizing feature allows you to enable or disable the automatic adjustment of images and videos within the lightbox to fit the screen. By utilizing autosizing, your media content will be displayed optimally, regardless of the viewer’s device or screen size. This feature is commonly used in web design and image galleries to provide a seamless and responsive user experience.
To enable or disable autosizing, follow these steps:
- Identify the image or video elements: Locate the HTML or CSS elements that represent the images or videos displayed within the lightbox. These elements typically contain the source URLs or references to the media content;
- Set the autosizing property: Once you have identified the media elements, you can modify their autosizing property. This property determines whether the images or videos should automatically adjust their size to fit the screen;
- Enable or disable autosizing: Decide whether you want to enable or disable autosizing based on your design requirements and the desired user experience. Enabling autosizing ensures that the media content is scaled appropriately to fit the screen while disabling it maintains the original size of the images or videos;
- Apply the autosizing property: Assign the chosen autosizing property value to the media elements. This can be done by adding CSS rules or modifying the corresponding HTML attributes. Ensure that the change is applied consistently across all relevant instances of the lightbox.
Captioning
The captioning feature in Lightbox 2 allows you to add informative captions to your images and videos, enhancing the context and information provided with your media content. Captions are displayed alongside the media items within the lightbox and can include text, descriptions, titles, or any relevant information you want to convey to the viewer.
To add captions to your images and videos, follow these steps:
- Identify the image or video elements: Locate the HTML or CSS elements that represent the images or videos displayed within the lightbox. These elements typically contain the source URLs or references to the media content;
- Add caption content: Determine the information you want to convey through captions. This can include titles, descriptions, credits, or any other relevant details associated with the media content;
- Modify the HTML or CSS code: Depending on the specific implementation of Lightbox 2, you may need to modify the HTML or CSS code to accommodate the caption content. This could involve adding new HTML elements, modifying existing ones, or applying CSS styles to achieve the desired visual presentation;
- Insert the caption content: Place the caption content within the appropriate HTML elements or CSS classes designated for displaying captions. Ensure that the content is accessible and properly associated with the corresponding media items;
- Customize the caption appearance: Apply CSS styles to control the font, size, color, alignment, and any other visual aspects of the captions. This allows you to match the captions’ appearance with the overall design of the lightbox.
Advanced Features of Lightbox 2
For those willing to explore beyond the basic features, Lightbox 2 offers several advanced functionalities that can further enhance your site’s visual presentation:
Grouping Images
The “Grouping Images” feature provides a convenient way to organize and display related images together in a single lightbox format. It allows users to scroll through the set of images without having to navigate back to the webpage. This feature is especially useful for portfolio sites, product showcases, or any scenario where it is important to present a series of related images in a sequential manner.
Key Benefits:
- Enhanced User Experience: Grouping images in a lightbox enables users to view related images without the need to load new pages or navigate away from the current page. This provides a seamless and immersive browsing experience;
- Sequential Viewing: Users can easily scroll through the set of images in the lightbox, allowing them to see the entire series without interruption. This is particularly useful for showcasing step-by-step processes, before-and-after transformations, or storytelling through images;
- Streamlined Navigation: With the grouped images displayed in a lightbox, users can navigate between images using intuitive controls, such as arrow buttons, keyboard shortcuts, or swipe gestures on touch-enabled devices. This simplifies the browsing experience and reduces friction.
Implementation Details:
To implement the “Grouping Images” feature effectively, consider the following:
- Lightbox Integration: Utilize a lightbox library or framework that supports image grouping. Popular options include Fancybox, Magnific Popup, or LightGallery. These libraries offer built-in functionalities for grouping images and provide customizable options for styling and behavior;
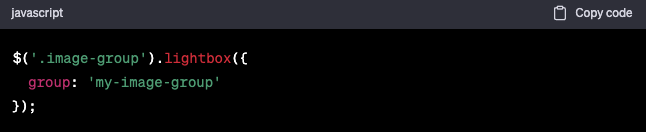
- HTML Markup: Organize the related images using appropriate HTML markup. Typically, each image is wrapped within a container element, such as a <div>, with a specific class or data attribute to indicate the grouping. For example:

- JavaScript Initialization: Initialize the lightbox library and configure the grouping feature using JavaScript. This involves selecting the appropriate elements using CSS selectors and specifying the grouping option. For example:
Slideshow Functionality
The “Slideshow Functionality” in Lightbox 2 enables you to create dynamic presentations of related images or videos with adjustable time intervals. This feature is particularly useful when you want to showcase a series of visual content in a sequential and automated manner.
Key Features:
- Automated Presentation: The slideshow functionality automatically transitions between images or videos at regular intervals, eliminating the need for manual navigation. This allows users to sit back and enjoy a hands-free viewing experience;
- Adjustable Time Intervals: Lightbox 2 allows you to customize the time interval between each slide transition. You can set a specific duration to control the speed of the slideshow, ensuring that the content is displayed at a comfortable pace for viewers;
- Flexible Media Support: The slideshow feature supports both images and videos, making it suitable for various types of content. You can combine different media formats within the slideshow to create a dynamic and engaging presentation.
Implementation Details:
To implement the “Slideshow Functionality” effectively, consider the following steps:
- Lightbox Integration: Choose a lightbox library or framework that supports slideshow functionality. Some popular options include Fancybox, Magnific Popup, or LightGallery. These libraries provide built-in features for creating slideshows and offer customization options;
- HTML Markup: Set up the slideshow structure in your HTML markup by organizing the images or videos within a container element. Each media item should be wrapped in a specific element, such as <div>, along with relevant attributes or classes. For example:
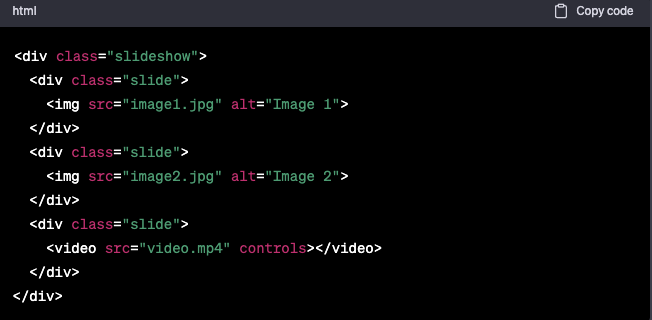
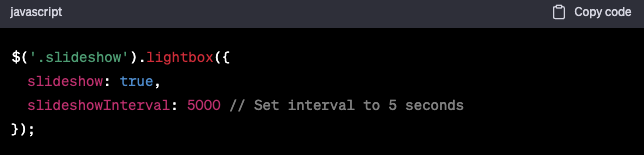
- JavaScript Initialization: Initialize the lightbox library and configure the slideshow functionality using JavaScript. This involves selecting the appropriate container element and specifying the desired slideshow settings. For example:
Keyboard Navigation
The “Keyboard Navigation” feature in Lightbox 2 allows users to navigate through your lightbox content using keyboard shortcuts. This feature enhances accessibility and usability, particularly for users who prefer or rely on keyboard navigation.
Key Features:
- Seamless Navigation: Keyboard navigation provides an alternative method for users to navigate through the lightbox content without relying solely on mouse or touch inputs. This allows for a more inclusive and user-friendly browsing experience;
- Intuitive Shortcuts: Lightbox 2 implements intuitive keyboard shortcuts that are easy to remember and use. These shortcuts typically involve common keys such as arrow keys, spacebar, and escape key to control various actions within the lightbox;
- Accessibility Enhancement: Keyboard navigation ensures that users with disabilities or mobility impairments can access and interact with the lightbox content effectively. It complements other accessibility features and adheres to web accessibility guidelines.
Implementation Details:
To implement the “Keyboard Navigation” feature effectively, follow these guidelines:
- Default Shortcuts: Familiarize yourself with the default keyboard shortcuts supported by the chosen lightbox library. These shortcuts might include navigation, closing the lightbox, and other relevant actions. For example:
| Keyboard Shortcut | Description |
|---|---|
| Arrow keys | Use the left and right arrow keys to navigate between images or slides within the lightbox. Pressing the left arrow key moves to the previous image or slide, while the right arrow key moves to the next one. |
| Spacebar | Press the spacebar key to move to the next image or slide within the lightbox. This allows for a quick and convenient way to progress through the series of images or slides without using the arrow keys. |
| Escape key | Press the escape key to close the lightbox. This shortcut provides a straightforward way to exit the lightbox and return to the original web page or content view. It allows users to easily dismiss the lightbox without navigating back or clicking a close button. |
- Customize Shortcuts (Optional): If the chosen lightbox library allows customization of keyboard shortcuts, consider adapting them to align with your application or website’s overall keyboard navigation patterns. This can be particularly useful if you have existing keyboard shortcuts or conventions in place.
- Accessibility Considerations: Ensure that the lightbox and its keyboard navigation features comply with accessibility standards. Use semantic HTML elements and attributes, such as ARIA roles and properties, to enhance compatibility with screen readers and assistive technologies.
Seamless Integration with WordPress Galleries
Lightbox 2 effortlessly integrates with the default WordPress galleries, making it easy to enhance your existing content without any extra work.
Troubleshooting Lightbox 2
| Problem | Solution |
|---|---|
| Lightbox 2 not working | Check if the Lightbox 2 plugin is activated and properly installed on your website or application. Verify that the required JavaScript and CSS files are included and loaded correctly. |
| Check for conflicts with other plugins or scripts. Disable other plugins temporarily to identify any conflicts. Ensure that there are no JavaScript errors or conflicts in the browser console. | |
| Images not displaying correctly | Verify that the image formats are supported by Lightbox 2. Commonly supported formats include JPEG, PNG, and GIF. Convert the images to a supported format if necessary. |
| Check the image sizes. Lightbox 2 may have limitations on image dimensions or file sizes. Make sure the images meet the required specifications. Resize or optimize the images if needed. | |
| Navigation issues | Ensure that the grouping feature is enabled for related images. Configure the HTML markup and JavaScript initialization to properly group the images together. |
| Check the keyboard navigation settings. Ensure that the arrow keys are assigned to navigate between images or slides. Verify that the spacebar is assigned to move to the next image or slide. Confirm that the escape key is assigned to close the lightbox. |
Conclusion
In today’s digital landscape, the presentation of visual content plays a pivotal role in capturing and retaining viewer attention. Plugins like WordPress Lightbox 2 empower content creators by providing an intuitive and engaging platform for showcasing media content.
By mastering the installation, customization, and advanced features of this tool, you can significantly elevate your website’s aesthetic appeal, usability, and overall user experience. Regardless of your website’s purpose or your level of WordPress proficiency, Lightbox 2 is a worthy addition to your digital toolbox.