
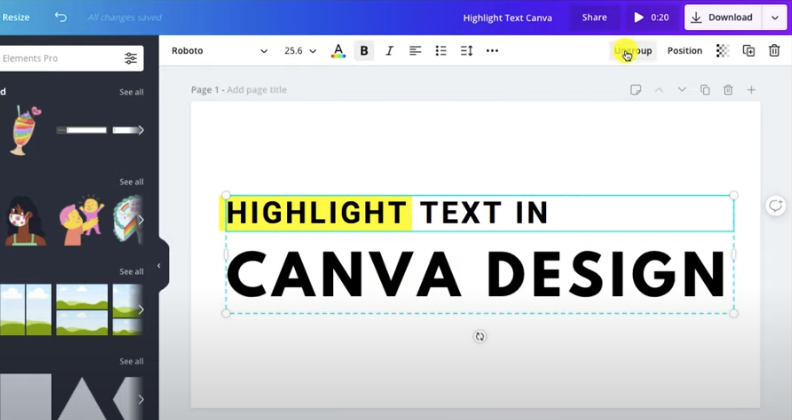
Highlighting Text in Canva
Canva, a graphic design platform, is widely recognized for its user-friendly interface and extensive range of features. It’s particularly popular among designers and non-designers alike for creating social media graphics, presentations, and other visual content. One such feature that users find valuable is text highlighting, which plays a pivotal role in making your designs stand out.
In this article, we will walk through a detailed process of how to highlight text in Canva. Despite the fact that Canva does not have an in-built ‘highlight text’ button, there are creative ways to achieve the desired effect.
Method 1: Using Shapes to Highlight Text
Step 1: Insert Text
To insert text in Canva, follow these steps:
- Launch Canva and open your design: Open Canva in your web browser or launch the Canva app. Once you’re in the Canva dashboard, click on the design you want to work on, or create a new design by selecting the appropriate template;
- Access the text tool: On the left sidebar, you’ll find various design elements. Look for the ‘Text’ tab and click on it. This will open a panel with different text style options.
- Choose your desired text style: Scroll through the available text styles to find the one that suits your design. Canva offers a wide range of fonts and text effects to choose from. Click on the desired text style to select it.
- Type your text onto the canvas: With the text style selected, you can now click anywhere on the canvas to start typing your text. A text box will appear, allowing you to enter your desired text. Customize the text further by adjusting its size, color, alignment, and other formatting options available in the text editing toolbar.
Step 2: Add Shape
To add a shape in Canva and highlight your text, follow these steps:
- Launch Canva and open your design: Open Canva in your web browser or launch the Canva app. Access the design you want to work on from the Canva dashboard or create a new design using a suitable template;
- Access the shapes library: On the left sidebar, locate the ‘Elements’ tab and click on it. This will open a panel with various design elements, including shapes;
- Choose the shape for highlighting: Browse through the shape options available, such as squares, circles, lines, etc. In this case, select the ‘Square’ shape to form a rectangle that can cover your text;
- Resize and position the shape: Click and drag the selected shape onto the canvas. Resize it to fit the area you want to highlight, such as covering the text. Adjust the position and dimensions of the shape by clicking and dragging its edges;
- Customize the shape: Once the shape is in place, you can customize its appearance by changing its color, opacity, border style, or adding additional effects using the options available in the toolbar.
Step 3: Position the Shape
To position the shape behind your text in Canva, follow these steps:
- Select the shape: Click on the shape you added to the canvas to select it. The selected shape will have bounding boxes and handles;
- Access the positioning options: Look for the ‘Position’ button on the top right menu, which appears as a square icon with arrows pointing in different directions. Click on the ‘Position’ button to access the positioning options for the selected shape;
- Move the shape backward: In the positioning options menu, you’ll find various options like ‘Forward,’ ‘Backward,’ ‘Bring to Front,’ and ‘Send to Back.’ To place the shape behind your text, click on the ‘Backward’ option. Each click will move the shape one step backward in the layer order;
- Verify the position: Keep clicking the ‘Backward’ option until the shape is positioned behind your text. You can visually confirm the position by checking that the text is not obscured by the shape.
Step 4: Customize the Shape
To position the shape behind your text in Canva, follow these steps:
- Select the shape: Click on the shape you added to the canvas to select it. The selected shape will have bounding boxes and handles;
- Access the positioning options: Look for the ‘Position’ button on the top right menu, which appears as a square icon with arrows pointing in different directions. Click on the ‘Position’ button to access the positioning options for the selected shape;
- Move the shape backward: In the positioning options menu, you’ll find various options like ‘Forward,’ ‘Backward,’ ‘Bring to Front,’ and ‘Send to Back.’ To place the shape behind your text, click on the ‘Backward’ option. Each click will move the shape one step backward in the layer order;
- Verify the position: Keep clicking the ‘Backward’ option until the shape is positioned behind your text. You can visually confirm the position by checking that the text is not obscured by the shape.
Method 2: Using a Highlighter Pen
To achieve a more authentic ‘hand-highlighted’ look, you can utilize the highlighter pen element in Canva. This method may not yield as clean results as the shape method but provides a more natural effect. Here’s a detailed breakdown of the steps involved:
| Step | Title | Description |
|---|---|---|
| 1 | Insert Text | Begin by adding the desired text to your Canva canvas. This can be done by selecting the text tool and typing or pasting your content onto the canvas. |
| 2 | Find Highlighter Pen | In the Canva interface, locate the ‘Elements’ tab. Within this tab, you will find a search bar. Type in “highlighter” to search for various highlighter pen designs available. |
| 3 | Insert Highlighter Pen | After performing the search, a range of highlighter pen designs will be displayed. Select the highlighter pen design that best suits your preference and add it to the canvas by clicking on it. |
| 4 | Resize and Position Highlighter Pen | Once the highlighter pen element is added to the canvas, you will need to resize it to cover the text that you want to highlight. To resize, click on the highlighter pen element and use the resizing handles that appear at the edges to adjust its size. Next, position the highlighter pen element behind the text. To achieve this, utilize the ‘Position’ button, which is typically located in the toolbar or menu options. Use the options available to send the highlighter pen element backward, ensuring it appears behind the text. |
| 5 | Adjust Color | If you wish to change the color of the highlighter, select the highlighter pen element by clicking on it. Then, locate the color button, usually found in the top left menu. By clicking on the color button, you can choose a different color for your highlighter pen. |
Conclusion
Understanding how to highlight text in Canva allows you to emphasize essential points, create contrast in your design, and guide your audience’s eyes to where you want them to look. By following the methods described above, you can easily create designs that have a greater visual impact. Canva’s versatility allows you to experiment and find the style that suits your design best. So, take advantage of these features to make your designs stand out even more.
FAQS
As of now, Canva does not have a direct ‘highlight text’ button. However, you can use different elements such as shapes or highlighter pen designs to create a similar effect.
Yes, it’s possible to adjust the transparency of the shape used for highlighting. After selecting the shape, go to the color menu, and you’ll find a checkered button at the top right corner which allows you to change the transparency.
Absolutely! You can change the color of the shapes or the highlighter pen designs to suit your preferences. Simply select the element and use the color button to choose the desired color.
Both methods discussed in this article can be applied to single or multiple lines of text. If you have a block of text that needs highlighting, just resize the shape or the highlighter element to cover the entire block.