
How to Add a New Layer in Photoshop
Adobe Photoshop serves as the benchmark in the realm of digital imaging. Its extensive array of tools, features, and capabilities positions it as the preferred choice for graphic designers, photographers, and visual artists alike. Among the fundamental concepts crucial for any Photoshop user to grasp is the concept of layers. This article aims to provide you with a comprehensive guide on incorporating a new layer in Photoshop, thus elevating your prowess in digital design and photo editing.
Grasping the Concept of Layers
Before delving into the process of adding a new layer, it is imperative to grasp the essence of what a layer truly entails. In its simplest form, layers function as translucent sheets meticulously stacked within your Photoshop project. Each layer can encompass distinct elements such as text, shapes, images, or effects that collectively compose your final design.
The primary advantage of utilizing layers lies in the ability to manipulate individual components of your design autonomously. By adopting this non-destructive approach to editing, you gain the assurance of being able to revert changes, relocate elements freely, or fine-tune layer properties without impinging upon the rest of your design.
| Layer Components | Description |
|---|---|
| Images | You can insert images as separate layers. |
| Text | Text elements are added on their unique layers, allowing you to modify them independently. |
| Shapes | Shapes, like rectangles, circles, or custom shapes, are added on individual layers. |
| Effects | You can apply effects like drop shadow, glow, etc., to individual layers. |
Adding a New Layer
Now, let’s explore the process of incorporating a new layer in Adobe Photoshop, following a step-by-step approach.
Step 1: Launch Photoshop and Open Your Desired Document
To commence working on your desired document within Adobe Photoshop, follow these instructions:
- Launch Photoshop: Start by opening the Adobe Photoshop application on your computer;
- Select Your Document: Once Photoshop is open, choose the specific document you intend to work on.
| Action | Instructions |
|---|---|
| For an Existing Document | If you have an ongoing project, simply select it from the file menu. |
| For a New Document | In case you’re initiating a new project, navigate to the “File” menu and click on “New” to create a fresh document. |
Step 2: Access the Layers Panel
To reach the Layers Panel in Photoshop, follow these guidelines:
- Locate the Panel: Typically, the Layers Panel is positioned on the right side of the workspace;
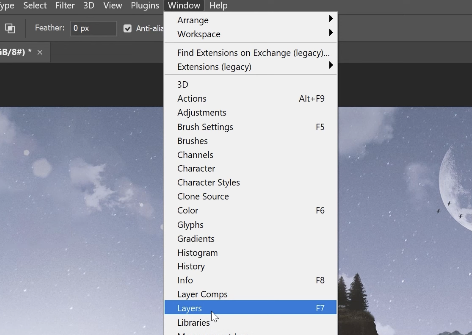
- Make it Visible: If the Layers Panel is not currently visible, proceed to the main menu and click on “Window”;
- Select Layers: From the dropdown menu, choose “Layers” to reveal the Layers Panel.
Step 3: Add a New Layer
There are several methods to add a new layer:
| Method | Description |
|---|---|
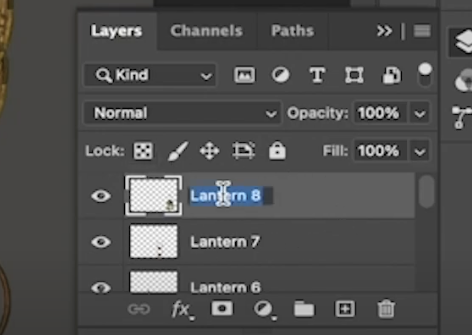
| Layers Panel Button | Located at the bottom of the Layers Panel, this icon resembles a square with a corner fold. By clicking on it, a new layer will be generated. By default, Photoshop assigns names such as “Layer 1,” “Layer 2,” and so forth. You can double-click on the name to rename it according to your preference. |
| Menu Bar | Select “Layer” from the main menu bar, then choose “New” and finally “Layer.” A dialog box will appear, enabling you to specify the layer’s name, properties like color and blending mode, and click “OK” to create the layer. |
| Keyboard Shortcuts (Windows) | Press Shift + Ctrl + N simultaneously. This keyboard shortcut will bring up the new layer dialog box on Windows. From there, you can assign a name to the layer, adjust its properties, and create it by confirming your choices. |
| Keyboard Shortcuts (Mac) | Press Shift + Command + N simultaneously. This keyboard shortcut is applicable to Mac users and will open the new layer dialog box. Within this dialog box, you can name the layer, define its properties, and proceed to create it. |
Organizing and Managing Layers
As your design becomes more intricate, it is crucial to maintain an organized Layers Panel to ensure efficiency. Here are a few valuable tips to achieve that:
- Name your Layers: Assign descriptive names to your layers, aiding in easy identification of their content or purpose. Simply double-click on the layer name within the Layers Panel to modify it;
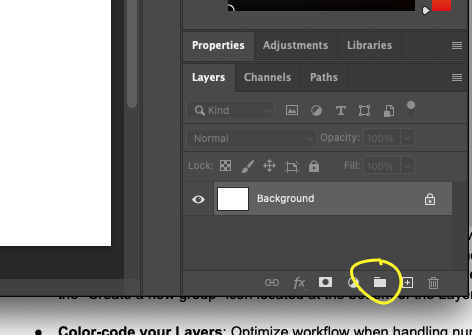
- Group-related Layers: Enhance organization by grouping relevant layers together. To do this, select the desired layers (hold down Ctrl or Command and click each layer), then press Ctrl + G (Command + G on a Mac). Alternatively, you can utilize the “Create a new group” icon located at the bottom of the Layers Panel;
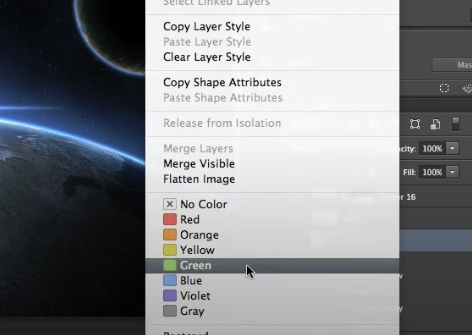
- Color-code your Layers: Optimize workflow when handling numerous layers by assigning color labels. Right-click on a layer and choose a color label from the “Layer Properties” dialog box that appears. This facilitates quick visual identification and differentiation;
- Adjust Layer Order: Easily modify the stacking order of layers by clicking and dragging them up or down within the Layers Panel. Layers higher in the panel will appear in front of those positioned lower, impacting their visibility within the design.
Conclusion
Unlocking the potential of Adobe Photoshop for digital design and photo editing necessitates a firm grasp of layers. These invaluable tools function as transparent sheets meticulously arranged within your Photoshop document, affording you the freedom to manipulate individual elements autonomously.
By embracing this non-destructive approach, you can introduce edits while preserving the integrity of your design. Adding new layers to your project is a straightforward process that empowers you to arrange elements, apply effects, and make adjustments without compromising the entirety of your composition.
Furthermore, optimizing your workflow involves adeptly organizing and managing layers. Employing techniques such as thoughtful naming, strategic grouping, intuitive color coding, and purposeful reordering empowers you to navigate complex projects with efficiency and precision. These skills and strategies unlock the gateway to unbridled creativity, enabling you to elevate your Photoshop designs to new heights.