How to Darken Background in Photoshop: A Step-by-Step Guide
Enhancing the background of an image through darkening can have a profound and captivating impact on your photographs. It adds depth and drama, elevating an ordinary composition into a visually mesmerizing masterpiece. Adobe Photoshop offers a powerful array of tools that allow you to effortlessly achieve this effect, taking your images to new heights. Within this article, we present a comprehensive step-by-step guide on how to accomplish this technique in Photoshop.
By adhering to our detailed instructions, you will acquire the ability to enhance the subject and captivate the viewer’s attention, resulting in stunning visuals that leave a lasting impression. Let us now delve into the process of darkening the background in Photoshop, unlocking a realm of creative possibilities for your photography.
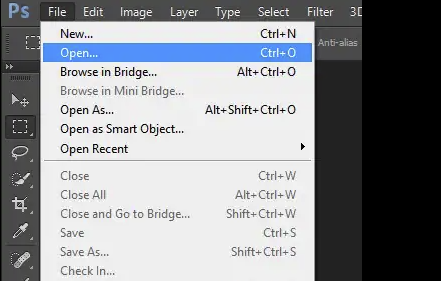
Step 1: Open the Image in Photoshop
To start, initiate Adobe Photoshop and access the image you wish to edit. Navigate to the “File” menu and choose “Open” from the options provided. Locate the specific image file on your computer and click “Open” to import it into Photoshop.
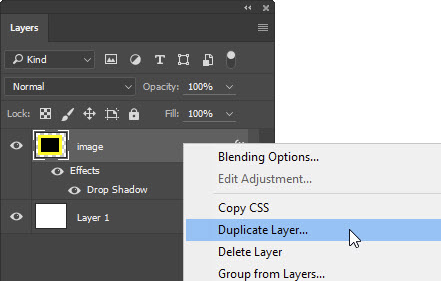
Step 2: Duplicate the Background Layer
To prevent permanent alterations to your original image, it is essential to operate on a duplicate layer. Begin by right-clicking on the Background layer within the Layers panel and selecting “Duplicate Layer.” A dialogue box will emerge, prompting you to assign a name to the duplicated layer. Proceed by clicking “OK” to generate the duplicate layer.
Step 3: Select the Background Layer
Direct your attention to the duplicate layer within the Layers panel and click on it to designate it as the active selection. This ensures that any modifications applied will solely impact the duplicate layer, keeping the original image untouched.
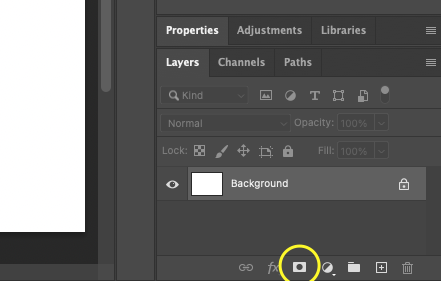
Step 4: Add a Layer Mask
Next, we’ll add a layer mask to the duplicate layer. Layer masks allow you to hide or reveal specific areas of a layer. To add a layer mask, click on the “Add Layer Mask” icon at the bottom of the Layers panel. A white mask thumbnail will appear next to the duplicate layer in the Layers panel.
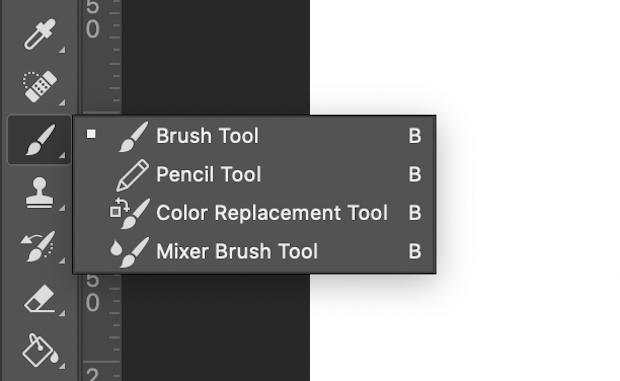
Step 5: Choose the Brush Tool
Select the Brush Tool from the Tools panel on the left side of the Photoshop interface. Adjust the brush size and hardness according to your image requirements. A larger and softer brush is generally suitable for smoothly blending the background.
Step 6: Set the Foreground Color
To darken the background, we need to set the foreground color to black. Press the letter “D” on your keyboard to reset the color palette. The foreground color should now be set to black, indicated by the small black square at the bottom of the Tools panel.
Step 7: Paint the Background
With the Brush Tool selected and the foreground color set to black, start painting over the areas of the background that you want to darken. As you paint with black, the layer mask will hide those areas, revealing the original background from the lower layer. If you make a mistake, switch the foreground color to white and paint over the areas to restore them.
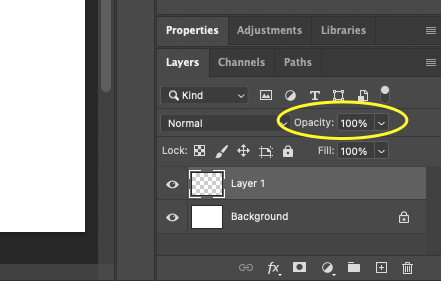
Step 8: Adjust Opacity and Flow
Depending on the level of darkness you desire, you can adjust the opacity and flow of the Brush Tool. Lowering the opacity will create a more subtle effect while increasing it will make the background darker. Experiment with different settings until you achieve the desired result.
Step 9: Refine the Edges
To ensure a seamless transition between the subject and the darkened background, you may need to refine the edges. Select the Layer Mask thumbnail in the duplicate layer, then choose the Brush Tool. Set the brush opacity to a lower value and paint along the edges of the subject to blend them with the background.
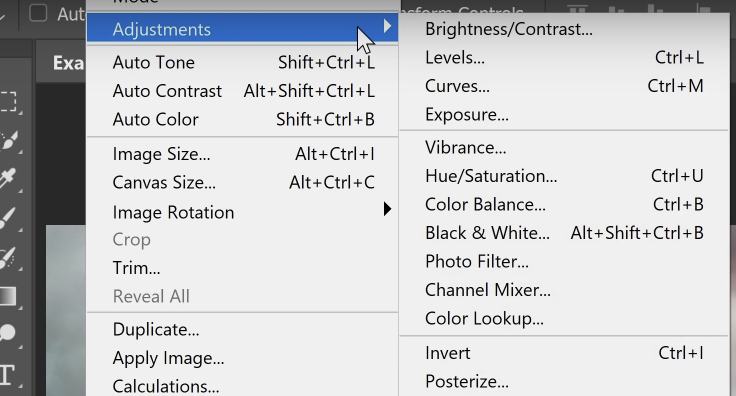
Step 10: Fine-tune the Adjustment
After darkening the background, you can further fine-tune the adjustment. Select the duplicate layer and navigate to the Adjustments panel. Here, you can explore options such as Levels, Curves, or Hue/Saturation to tweak the overall tonal range or color of the background.
Step 11: Save Your Edited Image
Once you are satisfied with the result, it’s time to save your edited image. Go to “File” and select “Save As” to choose the file format and location for your image. Make sure to save it with a different name to preserve the original file.
Conclusion
Darkening the background in Photoshop holds the incredible potential to enhance your images, infusing them with a sense of professionalism and unleashing your creative vision. This technique has the power to add depth and visual impact, transforming ordinary photographs into captivating visuals that demand attention. By diligently following the step-by-step instructions provided, you can master this skill and open up a world of possibilities for your photography. It is crucial to keep in mind the importance of working on a duplicate layer and experimenting with various settings to achieve the desired effect.
With dedicated time and practice, you will develop the ability to effortlessly elevate your photos into mesmerizing works of art, leaving a lasting impression on those who view them. So, let your creativity soar and embrace the boundless potential of darkening the background in Photoshop to enhance your images like never before.