How to Make a Layer Bigger in Photoshop
Adobe Photoshop is a multi-faceted tool that allows users to create, enhance, and alter images in a wide variety of ways. One essential feature of Photoshop is the ability to work with layers, which are like transparent sheets of glass stacked on top of each other, each holding different parts of the artwork. Resizing these layers provides the flexibility to customize each element of your design without affecting the rest of the image. This comprehensive guide will walk you through the process of making a layer bigger in Photoshop.
Understanding Layers in Photoshop
In the realm of digital art and graphic design, layers are a fundamental concept. Layers help you manage and organize your work, enabling you to manipulate individual components of an image without affecting others. Essentially, layers allow you to work on one part of an image without disturbing the others.
Table 1: Fundamental Layer Terms
| Term | Definition |
|---|---|
| Layer | A single level in the stacking order that can hold any number of objects |
| Background Layer | The bottommost layer in the Layers palette |
| Layer Panel | The panel in Photoshop where you can see all your layers |
The Importance of Resizing Layers
Resizing layers is a crucial aspect of working in Photoshop. It allows you to adjust the scale of different components in your design, giving you greater control over the final image. This could mean making a logo bigger for emphasis, shrinking a background element to create depth, or even resizing an image layer to fit a specific frame size.
How Photoshop Handles Resizing
When you resize a layer in Photoshop, the program uses a process called interpolation to create or remove pixels from the image. In simpler terms, it’s guessing what the image would look like at a different size by averaging the colors of nearby pixels. However, there are limits to this process. If you enlarge a layer too much, the image can lose detail and appear blurry or pixelated.
Preparing to Resize a Layer
Before you begin the process of resizing a layer, you need to ensure your workspace is properly set up. Here’s how you can do it:
- Step 1: Open Adobe Photoshop on your computer;
- Step 2: Open the image file with the layer that you want to resize;
- Step 3: In the Layer Panel, identify and select the layer that you want to resize.
Resizing a Layer in Photoshop
The process of resizing a layer in Photoshop is relatively straightforward. Follow the steps outlined below to successfully increase the size of a layer:
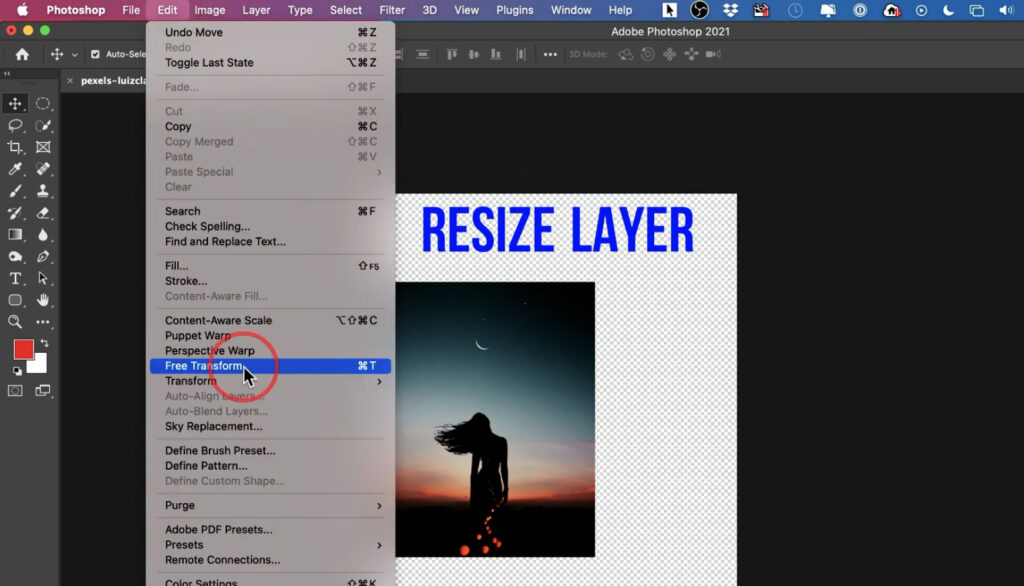
Step 1: With the desired layer selected, go to the top menu, select “Edit” and then click on “Free Transform” or use the shortcut (Ctrl + T on Windows, or Command + T on MacOS);

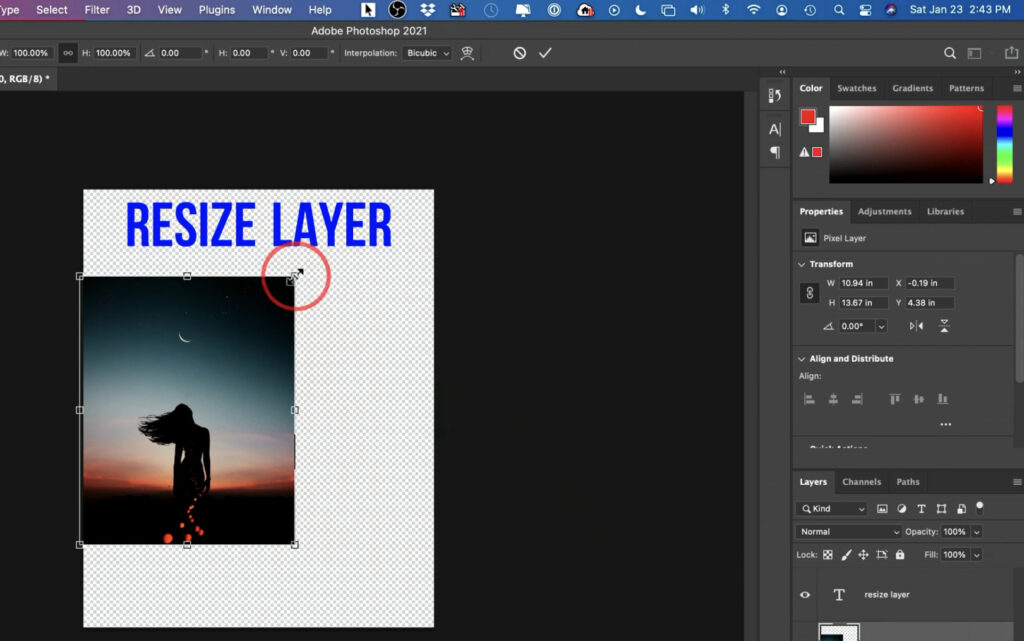
Step 2: A bounding box with small squares (also known as handles) will appear around the selected layer;

Step 3: Position your cursor over one of the corner handles. Your cursor will change to a double-headed arrow;
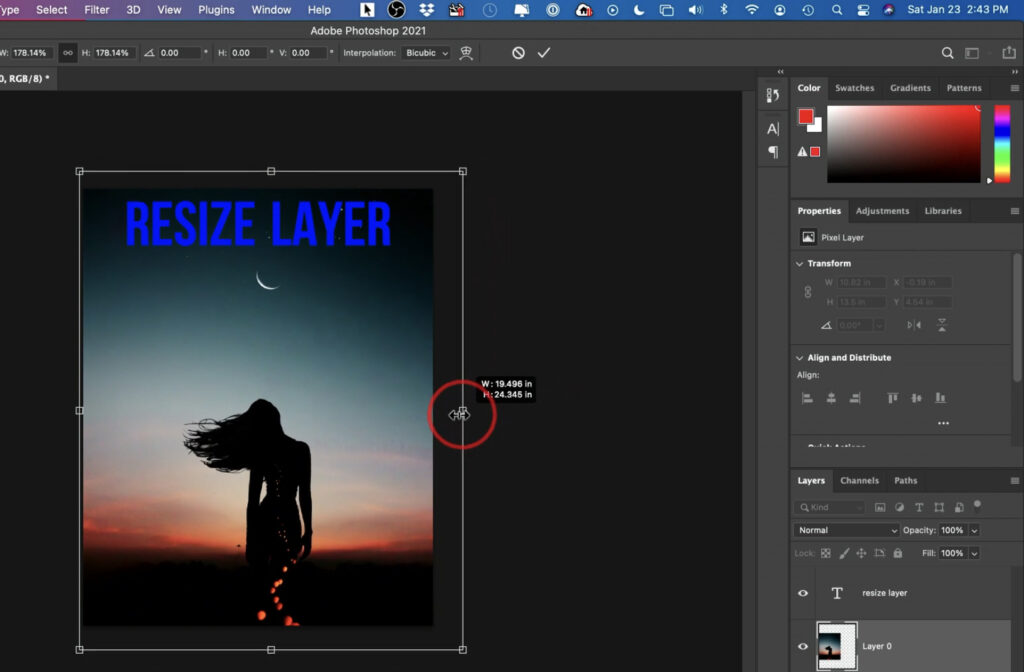
Step 4: Click and drag the corner handle to resize the layer. Hold the Shift key while dragging to maintain the original aspect ratio of the layer;

Step 5: Once you are satisfied with the new size, press “Enter” on your keyboard to apply the changes.
Table 2: Step-by-Step Guide to Resizing a Layer
| Step | Action | Shortcut |
|---|---|---|
| 1 | Select Free Transform | Ctrl + T (Windows), Command + T (Mac) |
| 2 | Position cursor over handle | N/A |
| 3 | Drag to resize | Hold Shift to maintain aspect ratio |
| 4 | Apply changes | Press Enter |
Considerations When Resizing a Layer
When resizing a layer in Photoshop, there are several important considerations to keep in mind:
- Image Quality: As mentioned, enlarging a layer too much can cause the image to appear blurry or pixelated. It’s important to keep an eye on the quality of your image as you resize;
- Aspect Ratio: When resizing a layer, it’s crucial to maintain the layer’s aspect ratio to prevent distortion. Holding down the Shift key while dragging the corner handles of the bounding box will keep your layer’s proportions consistent as you resize;
- Alignment: If you’re working with multiple layers, you’ll want to consider how resizing one layer will affect the alignment of your overall composition;
- Layer Visibility: If you’re working with a smaller layer on a large canvas, making the layer significantly larger might cause parts of it to become hidden outside the canvas. In such cases, you’ll need to resize your canvas to ensure the entire layer is visible.
Troubleshooting Common Issues
Like with any complex tool, you may run into some issues when trying to resize a layer in Photoshop. Here are a few common problems and how to resolve them:
| Issue | Solution |
|---|---|
| The layer is locked | In the Layers Panel, click the lock icon next to the layer name to unlock it. You cannot resize a locked layer. |
| Unable to maintain aspect ratio | Hold the Shift key while dragging a corner handle during the resizing process. This will maintain the width-to-height ratio of the layer. |
| Resized layer not visible on canvas | If your resized layer is too big for the current canvas, you can increase your canvas size by navigating to “Image” > “Canvas Size” in the top menu. |
Conclusion
Learning to resize layers in Photoshop is a key skill in digital editing and design. It offers flexibility and control, enabling you to create complex compositions with ease. As you become more familiar with this tool, you’ll find that manipulating layers becomes second nature. Remember, practice is essential when mastering any new skill, so don’t hesitate to experiment with resizing layers in your own projects.