How to Select a Color in Procreate
Unleashing the true potential of your digital canvas, Procreate stands out as an exceptional tool for artists, offering a plethora of vibrant hues to work with. Its remarkable color capabilities provide an almost boundless palette, granting artists the freedom to select their desired shades with precision. Within this all-encompassing manual, we will take you on a journey through the diverse techniques of color selection in Procreate, empowering you to harness the full artistic spectrum.
Understanding Procreate’s Color Interface
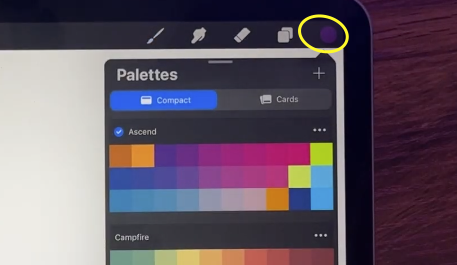
Located at the upper right corner of the Procreate interface, you will find a prominent circle known as the Color Button. By tapping on this button, the color picker is revealed, presenting you with five distinct methods to select your desired color:
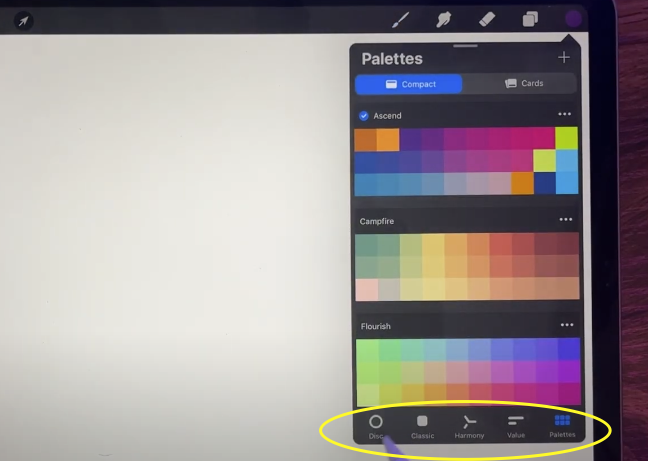
- Disc;
- Classic;
- Values;
- Palettes;
- Harmony.
Each of these color selection methods caters to different artistic preferences and working styles. By exploring and utilizing these options, you can choose the method that best aligns with your creative process and enhances your overall artistic output.
Disc
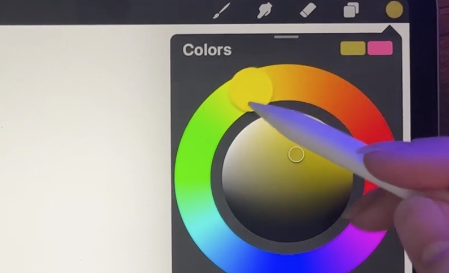
The ‘Disc’ feature offers a color selection interface in the form of a wheel or disc. On the outer ring, users can conveniently pick their desired hue. Within the inner triangle, adjustments for saturation (left to right) and brightness (bottom to top) can be made with ease.
| Saturation | Horizontal axis in the triangle |
| Brightness | Vertical axis in the triangle |
| Hue | Outer ring of the disc |
Classic
The ‘Classic’ choice operates in a manner similar to the color selection tools commonly found in various digital art applications. It offers two sliders, one for adjusting brightness and another for manipulating saturation, accompanied by a hue bar.
| Saturation | Horizontal slider |
| Brightness | Vertical slider |
| Hue | Hue bar |
Values
The ‘Values’ technique enables artists to specify precise color values. This option proves beneficial for artists who prefer working with exact color specifications.
| H (Hue) | 0-359 |
| S (Saturation) | 0-100% |
| B (Brightness) | 0-100% |
| R (Red) | 0-255 |
| G (Green) | 0-255 |
| B (Blue) | 0-255 |
| Hexadecimal | #000000 – #FFFFFF |
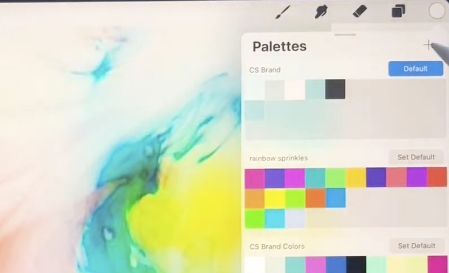
Palettes
The ‘Palettes’ feature provides artists with a comprehensive color library where they can create, manage, and utilize color palettes. This functionality proves especially valuable for artists who consistently work with specific color schemes.
Harmony
The ‘Harmony’ approach assists artists in selecting colors that harmonize well together. Users can choose from various options such as Complementary, Split-Complementary, Analogous, Triadic, and Tetradic, to achieve pleasing color combinations.
Selecting Your Desired Color
Now that we have explored the five color selection methods, let’s discuss how you can utilize these tools to pick your desired color.
Open the Color Picker: Tap on the Color Button located at the top right corner of the Procreate interface. This action will open the color picker.
Choose Your Method: Select your preferred method of color selection: Disc, Classic, Values, Palettes, or Harmony.
Adjust the Parameters: Depending on the chosen method, adjust the relevant parameters (hue, saturation, brightness, etc.) to achieve your desired color. In Disc, Classic, and Harmony, you can do this visually, while in Values, you will need to input the precise color values. For Palettes, simply choose a color from your pre-created palette.
Confirm Your Selection: Once you’re satisfied with the color, tap anywhere outside the color picker to close it. Your chosen color will appear in the Color Button.
Begin Painting: Use your chosen color to start creating. If you wish to change the color at any point, simply repeat this process.
Pro Tips for Selecting Colors in Procreate
Here are some additional tips and tricks that can make your color selection process smoother and more efficient:
Saving a Color: After selecting a color, you can save it to a palette for future use. Simply open the Palettes tab, tap the ‘+’ button, and your color will be added.
Eyedropper Tool: To pick a color directly from your canvas, touch and hold your stylus or finger on the screen. This activates the Eyedropper Tool, and you can drag it to the desired color.
Color Companion: The Color Companion, available on the right side of the interface, is a quick access panel for managing colors. You can drag and drop colors from the Color Button to the Color Companion for easy access.
Conclusion
Procreate’s array of color selection tools empowers artists to craft vivid and captivating artwork with meticulousness and adaptability. Through features such as color wheels and gradients, artists are able to delve into a vast spectrum of possibilities and breathe life into their artistic vision. This software bestows artists with extensive control over hues, enabling them to achieve nuanced transitions and bold juxtapositions. With Procreate, artists can unleash their creative potential and metamorphose their ideas into visually enthralling masterpieces.