Lowering Layer Opacity in Procreate: Step-by-Step Guide
In the Procreate app, layer opacity determines how transparent or visible a layer is compared to the ones beneath it. It gives you the power to adjust the visibility of those below your current sheet.
When you make a new layer in Procreate, it automatically starts with 100% opacity, meaning it’s fully opaque and covers the ones underneath. By changing the level of transparency and visibility, you can make it partially see-through, enabling the tiers below to show through.
Understanding Layer Opacity in Procreate
Layer opacity is a crucial feature in Procreate that empowers you to explore a world of artistic possibilities. By grasping the concept and knowing how to manipulate it, you can elevate your design skills to new heights.
To adjust the level of transparency or visibility of a layer in Procreate, follow these steps:
- Open the Layers panel: Locate the wrench icon in the upper left corner of the screen and tap on it. This will reveal the Layers tab;
- Select the desired layer: Identify the option you wish to modify and tap on it. The selected one will then be highlighted;
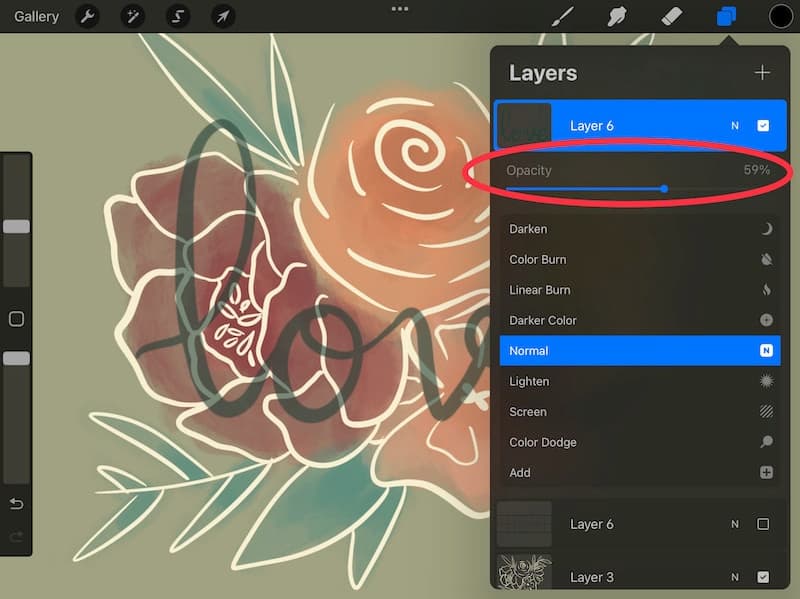
- Access the Opacity slider: On the right side of the panel, you’ll find a slider labeled Opacity. To make the layer more transparent, slide the control towards the left. Conversely, sliding it towards the right will increase the level of visibility, making the tier more opaque;
- Observe the real-time changes: As you make adjustments, you’ll instantly see the layer becoming more or less transparent, enabling you to view the ones beneath it.
In Procreate 5, the Opacity slider has undergone a slight change in placement compared to previous versions. In older versions, it resided in the settings menu alongside other options like Liquify, Bloom, and Blur. However, the recent update has relocated the slider, making it accessible through the Layers panel.
By reducing the level of visibility, you can create subtle or transparent overlays, allowing glimpses of the underlying tiers. This technique is commonly utilized for shading, generating a glowing effect, or adding texture to your artwork.
Adjusting Layer Opacity in Procreate for iPad
To change the opacity of a layer in Procreate for iPad, follow these simple steps:
- Open Procreate: Launch the app on your iPad and either open an existing artwork or create a new canvas;
- Access the Layers panel: Tap on the layer icon located in the upper-right corner of the screen. It resembles two folded squares;
- Explore the panel: On the left side of the screen, the panel will appear, presenting a list of options in your artwork;
- Select the desired layer: Click on the option you want to modify. This action will highlight the selected option, indicating that it’s active;
- Open the “Layer Options” menu: On the right side of the screen, you will see the menu, which provides various settings for the selected option;
- Locate the Opacity slider: Within the menu, find the slider. It is represented by a circle with a percentage value inside;
- Adjust the Opacity: To change its level, drag the slider left or right. Moving it to the left decreases the opacity, making the layer more transparent and vice versa.
- Observe real-time changes;
- Fine-tune the opacity: Continue adjusting until you achieve the desired effect for your artwork;
- Close the “Layer Options” menu: Once you are satisfied with the settings, you can close the “Layer Options” menu by tapping anywhere outside the menu.
You can repeat these steps for other layers in your artwork as well.
By controlling the level of transparency, you will be able to create various visual effects in your work. This powerful feature allows for blending, overlays, adding shadows, and more.
Mastering Layer Opacity with the Opacity Slider in Procreate
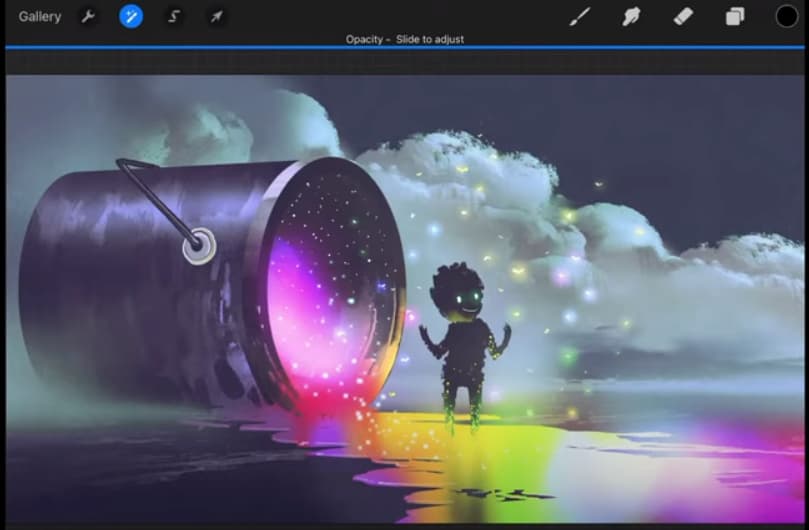
Explore the intuitive and efficient method of adjusting the level of transparency and visibility in Procreate using the Opacity slider. This feature allows you to have precise control over the visibility and blending of layers in your artwork.
Follow these simple steps to make the necessary changes:
- Select the Target Layer on the Layers Panel: Identify the specific layer for which you want to modify the opacity. Click on the desired layer to highlight it, indicating that it is active;
- Open the Layer Options Menu: On the right side of the screen, you will find the Layer Options menu, which provides a range of settings for the selected layer;
- Locate the Slider: Within the Layer Options menu, seek out the slider. It is represented by a circular shape, containing a percentage value that indicates the current transparency level;
- Adjust the visibility level, observe real-time changes, and fine-tune it;
- Close the Layer Options Menu: Once you are satisfied with the settings, simply tap anywhere outside the Layer Options menu or click the layer icon again to close the menu.
Now that you have successfully made all the adjustments, you can repeat these steps for other layers in your composition. Enjoy experimenting with different transparency settings to bring your artistic vision to life.
Controlling Layer Opacity in Procreate: Using the Layers Menu Shortcut
Discover a convenient and efficient way to adjust layer transparency in Procreate through the “Layers” menu shortcut. This method allows you to create unique layering effects and achieve your desired visual outcomes.
Follow these next steps to change layer visibility:
- Identify the Target Layer on the Layers Panel: Within this panel, locate the specific layer for which you want to modify the opacity. Press and hold your finger or stylus on the layer thumbnail for a brief moment. This activates the “Layers” menu shortcut;
- Open the “Layers” Menu: While still holding your finger or stylus on the layer thumbnail, drag it towards the right side of the screen. This gesture triggers the appearance of a vertical menu on the left side of the screen, offering various options for the selected layer;
- Locate the Slider: Find a circular shape with a percentage value denoting the current opacity level;
- Adjust the level of visibility, observe real-time changes, and fine-tune it;
- Release and Proceed: Once satisfied, release your finger, and the Layers menu will automatically close, enabling you to continue working on your artwork seamlessly.
This method offers a quick and accessible approach to modifying the level of visibility without the need to access the Layer Options menu.
Changing the Opacity of Multiple Layers in Procreate
In Procreate, you have the ability to modify the opacity of multiple layers simultaneously using the powerful “Group” feature. This allows you to efficiently apply the necessary adjustments to a set of layers in your artwork.
Here’s how you can change the transparency level of multiple tiers at once:
- Select Multiple Layers on the Layers Panel: To choose multiple options, tap and hold your finger or stylus on the first layer you wish to adjust. While continuing to hold, tap on additional options that you want to include in the selection. Each selected layer will be highlighted to indicate its inclusion;
- Release and Maintain Selection: Once you have selected all the desired options, release your finger or stylus while ensuring that the selected layers remain highlighted;
- Group the Layers: With the selected tiers still highlighted, click the “Group” button located at the top of the Layers panel. This button is represented by a folder icon. The selected options will now be consolidated into a new group, inheriting the original layers’ opacity as a default;
- Select the Group: To modify the viability level of the grouped layers, click on the newly created group in the Layers panel. It will be distinguished by a folder icon, indicating its grouped nature;
- Adjust and Modify the Opacity: With the group selected, utilize any of the previously mentioned methods to adjust the viability level (e.g., the slider in the Layer Options menu or the Layers menu shortcut). Drag the slider upward or downward to increase or decrease the level of transparency for all the options within the group simultaneously. Observe the real-time changes as the entire group becomes more or less transparent;
- Proceed.
Grouping layers empowers you to efficiently change the level of transparency and visibility for several options at once, facilitating global adjustments and effects while preserving their individual content.
However, if you need to make individual adjustments to specific layers again, remember to ungroup them. Simply click on a group in the Layers panel and choose the “Ungroup” option from the available menu.
Changing Selection Opacity in Procreate
Adjusting the opacity of a selection in Procreate provides a non-destructive way to modify transparency without altering the original artwork. This allows for greater flexibility and creativity in your design process.
Follow these steps to change the level of transparency or visibility of a selection in Procreate:
- Activate the Selection Tool: Tap the wrench icon located in the upper left corner of the screen. This action opens the Actions menu, providing various tools and options;
- Access the Selection Tab: Within the Actions menu, select the “Selection” tab to access the selection-related features;
- Choose the Selection Tool: From the available options, select the desired selection tool that best suits the area you wish to adjust. Options include Free Line, Rectangle, Ellipse, and more;
- Make the Selection: Use the selected tool to make a precise selection on the canvas. Simply glide your finger or stylus over the desired area, and you will observe an outline of marching ants marking the selected region;
- Open Selection Options: After making the selection, tap the “Selection” tab in the Actions menu once again to reveal the selection-specific options;
- Locate the Slider and Adjust Opacity: Drag your finger or stylus upward or downward on the slider to change the visibility level of the selection;
- Real-Time Transparency: As you make adjustments, the selection will dynamically change in real time;
- Finalize Opacity: Continue dragging the slider until you achieve the desired transparency level for your selection;
- Proceed.
This enables you to apply specific settings to a particular area, allowing for targeted effects and highlighting within your artwork.
Mastering Brush Opacity in Procreate
Controlling the level of transparency or visibility of your brush strokes in Procreate provides you with the ability to adjust transparency and visibility, enabling you to achieve a wide range of artistic effects.
Follow these next easy steps to change the opacity of a brush:
- Access the Brush Library: Tap the brush icon located at the top right of the screen. This action opens the Brush Library, showcasing an array of brush sets and options;
- Select the Desired Brush: Within the Brush Library, choose the brush that you wish to modify by simply tapping on it. The selected brush will be visually highlighted, indicating your choice;
- Open the Brush Studio: After selecting the brush, the Brush Studio panel appears on the left side of the screen, unveiling a plethora of brush settings and options;
- Locate the Slider: In the Brush Studio panel, navigate to the slider. It is visually represented as a circular element, displaying a percentage value inside;
- Adjust the Brush Opacity: Utilize your finger or stylus to swipe upward or downward on the slider.
- Preview and fine-tune;
- Finalize and continue creating.
This feature empowers you to exercise precise control over the transparency and opacity of your brush strokes, unlocking a world of creative possibilities.
Adjusting Layer Opacity in Procreate Pocket
Procreate Pocket, tailored specifically for iPhone and iPod Touch devices, provides a mobile version of the powerful Procreate app.
While offering many similar features to its full-fledged counterpart, Procreate Pocket has its own unique characteristics to enhance your mobile creative experience. Here’s how you can change the visibility of a layer in Procreate Pocket:
- Select the Layer on the Layers Panel: Within the panel, identify the one for which you want to adjust the opacity. Tap on the desired option to select it. The selected layer will be visually highlighted;
- Open the Options Menu: Once you’ve selected a layer, the “Layer Options” menu will appear at the bottom of the screen, showcasing various options specific to that layer;
- Locate the slider, adjust the layer visibility, and preview;
- Fine-tune, finalize and continue.
Remember, altering the layer opacity in Procreate Pocket empowers you to experiment with various creative techniques such as blending, adding overlays, incorporating shadows, and more. Explore the possibilities and unleash your artistic potential with the mobile convenience of Procreate Pocket.
Additionally, Procreate Pocket offers multiple export options, allowing you to save and share your creations with ease. Export your artwork as PNG, JPEG, or Procreate (.procreate) files, and effortlessly share them via email, social media platforms, or other compatible applications. Enjoy the mobility and flexibility of Procreate Pocket in showcasing your artistic endeavors to the world.
Creating a Translucent Effect on the Canvas in Procreate
While Procreate doesn’t offer a direct opacity setting for the canvas itself, you can achieve a similar effect by manipulating the layer transparency and visibility or utilizing blending modes.
Here’s how you can lower the perceived visibility of the canvas:
- Select the Topmost Layer on the Layers Panel: By default, your artwork will have one option named “Layer 1.” If you have multiple options, ensure the topmost layer is selected in the panel;
- Adjust It as Described Above;
- Real-Time Preview: Observe the real-time changes in the layer’s transparency, giving the impression of reducing the canvas opacity;
- Fine-tune the effect.
Alternatively, you can experiment with different layer blending modes to achieve the desired visibility effect:
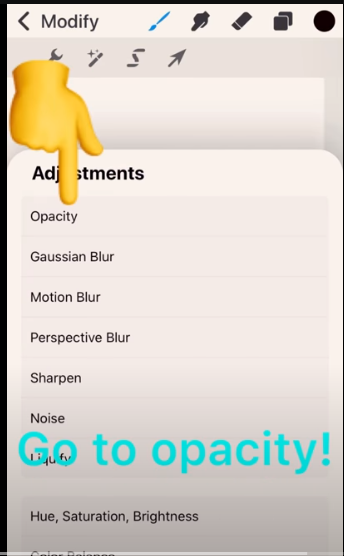
- Access Layer Options: Follow steps 1-3 mentioned above to select the topmost layer in the Layers panel.
- Explore Blend Modes: In the Layer Options menu, locate the “Blend Mode” drop-down menu. Click on it to reveal a list of available blending modes;
- Select a Blend Mode: Choose a blending mode that suits your artistic vision. Blending modes like “Multiply” or “Overlay” can create a translucent effect on the canvas;
- Observe the Result: As you select a blending mode, observe how it affects the transparency and appearance of your artwork. Adjust the opacity of the layer if needed to fine-tune the effect further.
By adjusting the opacity or employing different blending modes, you can exert control over the overall transparency and visibility of your artwork, giving the illusion of lowering the opacity of the canvas itself. Remember to create a new layer if you wish to make changes specific to that option without impacting the ones below it. Unleash your creativity and explore the possibilities of translucent effects in Procreate.