
Mastering Alpha Lock in Procreate: The Ultimate Guide
If you’re an aspiring digital artist, then you’re probably familiar with Procreate, the popular iPad app that has taken the creative world by storm. One of the app’s most useful features is Alpha Lock, which allows you to lock the transparency of a layer, making it easier to edit without affecting the rest of your artwork.
But how does it really work, and how can you use the feature to take your digital art to the next level?
In this article, we’ll explore everything you need to know about mastering Alpha Lock in Procreate. From the basics to advanced techniques, we’ll give you the tools you need to create precise and efficient digital art that stands out from the crowd.
Understanding the Power of Alpha Lock in Procreate
Alpha Lock is a powerful feature in Procreate that allows artists to create precise and efficient digital art. With it, you can lock the transparency of a layer, which means you can only paint within the existing shapes on that layer without affecting the transparency itself. This feature is especially useful when working on complex or intricate artwork, as it helps to prevent accidental smudging or overlapping of colors.
In essence, AL works by creating a mask over the transparent areas of a layer, which ensures that any painting or editing you do stays within the confines of the shapes on that layer. By enabling the feature, you can add color and detail to your artwork without worrying about going outside the lines or affecting other layers in your composition. This allows you to work more efficiently, and with greater precision, which is crucial when creating professional-level artwork.
Overall, Alpha Lock is an essential tool in Procreate that can help artists of all levels to create precise and efficient digital art. By understanding how this feature works and how to use it effectively, you can take your artwork to the next level and produce professional-quality results.
A Step-by-Step Guide to Using Alpha Lock in Procreate
AL can be used in combination with other features in Procreate, such as layer masks and blend modes, to create even more complex and dynamic effects. For example, you can use the feature to create a layer mask, which will allow you to paint on a specific area of your artwork without affecting the rest of the layer. You can also use it with blend modes to create unique textures and color effects, such as overlays and gradients.
Using Alpha Lock in Procreate is a pretty straightforward process that can enhance your digital artwork. By following these next step-by-step instructions, you’ll be able to create stunning illustrations with precision and ease:
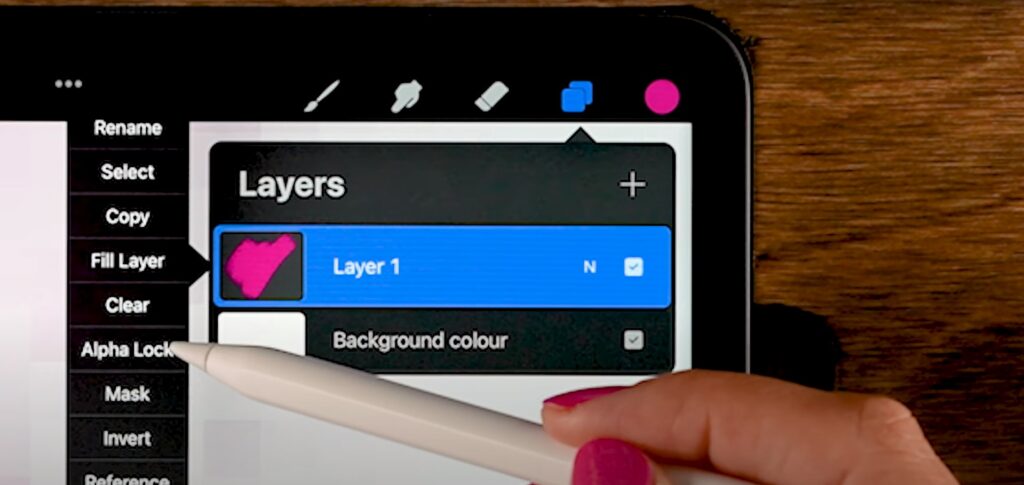
- Layer Selection: Start by selecting the layer you wish to work on. This can be done by tapping on the desired layer in the Layers panel on the right side of the screen. Ensure that the layer contains the shapes or elements you want to paint within;
- Activating Alpha Lock: With the chosen layer selected, swipe right on the layer in the Layers panel. This action will reveal additional layer settings. Look for the “Alpha Lock” button and tap it to activate the feature for that layer. You’ll notice a checkerboard pattern appear on the layer thumbnail, indicating that AL is now enabled;
- Painting within Existing Shapes: Now that the feature is activated, you can begin painting within the existing shapes on the layer without affecting the transparency. Choose your desired brush and color and start applying your strokes. Procreate will automatically restrict the painting to the existing shapes on the layer, ensuring that you stay within the lines;
- Refining and Detailing: AL is especially helpful when adding details and refining specific areas of your artwork. By using smaller brushes, you can achieve precise lines, textures, and shading within the confined shapes. Take advantage of the versatility offered by the feature to add depth and dimension to your illustrations;
- Experimentation and Creativity: Don’t be afraid to explore different techniques and brush settings while using AL. Combine it with other Procreate features such as layer masks, blend modes, or adjustments to unlock even more creative possibilities. Let your imagination soar as you leverage the power of Alpha Lock to create unique and captivating digital art.
By following these steps, you’ll be able to bring your digital creations to life with enhanced clarity and professionalism.
Harnessing Artistic Flexibility: Exploring Clipping Masks and Layer Masks in Procreate
Clipping masks and layer masks are invaluable features in Procreate that empower artists to elevate their digital artwork with precision and creativity. By understanding the essence and applications of these powerful tools, you can unlock a whole new level of artistic expression.
Clipping Masks
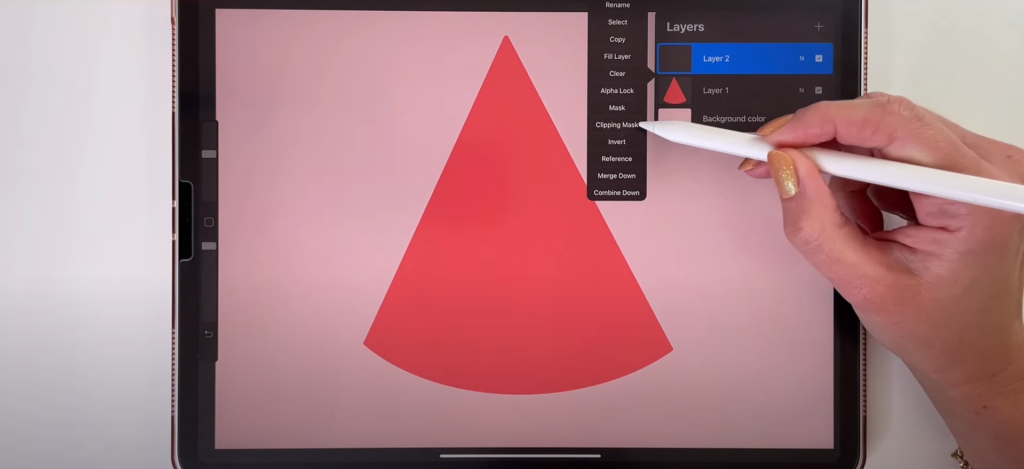
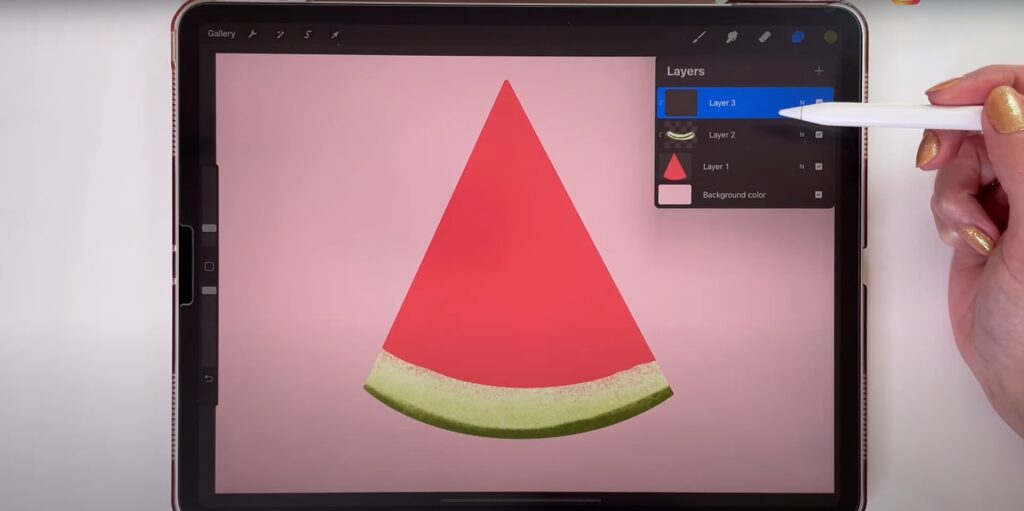
Within Procreate, clipping masks offer a powerful way to control the visibility of a layer based on the shape of another layer. To utilize this feature, simply select the desired layer to be masked and position it above the layer that will serve as the clipping mask. By swiping right on the upper layer and selecting “Clipping Mask,” the two layers become linked, confining the visible content of the clipped layer within the boundaries defined by the layer below. This technique proves invaluable when incorporating intricate designs or working on projects involving complex shapes.
With clipping masks, effortlessly applying textures, patterns, or colors to specific areas becomes a seamless process, ensuring integration with finesse and boosting the overall visual impact.
Layer Masks
Layer masks in Procreate offer a non-destructive method for concealing specific parts of a layer without permanent removal. To employ a layer mask, simply select the desired layer and access the mask icon located in the Layers panel. This action generates a grayscale mask that governs the visibility of the underlying layer. White regions in the mask unveil the layer, while black areas hide it. By employing various shades of gray, you can achieve diverse levels of transparency, facilitating smooth transitions and subtle blending effects.
Layer masks prove indispensable when exploring different artistic choices or creating multiple iterations of your artwork. They bestow the freedom to experiment, refine, and make adjustments to your composition without compromising the integrity of the original elements.
By incorporating clipping masks and layer masks into your Procreate workflow, you gain precise control over the visibility and interaction of various layers within your artwork.
Conclusion
The combination of Alpha Lock, clipping masks, and layer masks within Procreate is a valuable asset for digital artists. With the ability to add intricate details, depth, and experimentation, these features become your indispensable creative allies. Whether you’re a beginner or a professional artist, harnessing the power of these tools can unlock limitless artistic potential.
Embrace the endless possibilities that Procreate offers, let your imagination run wild, and explore your creative potential. With Alpha Lock, clipping masks, and layer masks at your disposal, you can take your artwork to new heights and create stunning masterpieces that will inspire others. So, don’t hesitate, dive into Procreate, and let your creativity flourish.