Mastering Image Recoloring in Photoshop
Adobe Photoshop is a versatile tool that offers vast possibilities for image editing, including the ability to recolor images. This guide will dive into the details, providing you with a robust understanding of how to recolor an image in Photoshop.
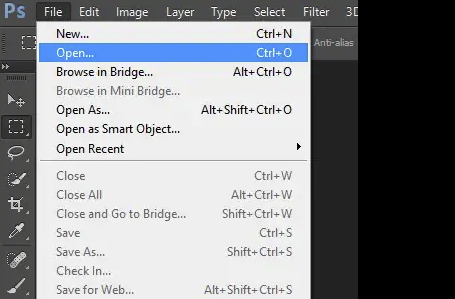
1. Opening the Image in Photoshop
The first step in the process is to open the image you want to recolor. Here’s how to do it:
| Steps | Instructions |
|---|---|
| Step 1 | Launch Adobe Photoshop. |
| Step 2 | Click on File in the menu bar. |
| Step 3 | Select Open. |
| Step 4 | Navigate to the image you want to recolor and click Open. |
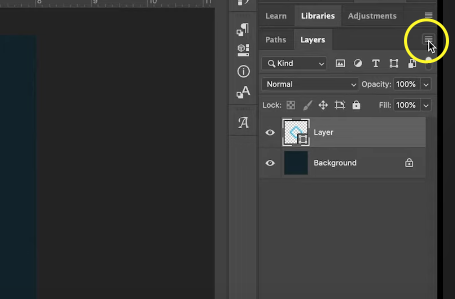
2. Duplicating the Layer
Duplicating the original layer of your image before editing helps preserve the original image. It provides an easy way to revert to the original state if required.
| Steps | Instructions |
|---|---|
| Step 1 | In the Layers panel, right-click on the background layer. |
| Step 2 | Select Duplicate Layer from the dropdown menu. |
| Step 3 | Click OK in the dialog box. |
3. Understanding the Photoshop Workspace
Before delving into the process of recoloring, understanding the Photoshop workspace is essential. The workspace includes:
- Menu Bar: Found at the top of the screen, it holds all the main functions such as File, Edit, Image, Layer, Select, Filter, View, Window, and Help;
- Options Bar: This bar changes depending on the tool you have selected. It provides options for the active tool;
- Tools Panel: This panel contains various tools for creating and editing images, artwork, page elements, and so on. The tools you’ll use most often are the selection tools, the editing tools, and the painting tools;
- Panels: They can contain a variety of controls to view and modify images. The Layers panel is a common one used for recoloring.
- Document Window: This displays the file you’re working on. Multiple Document Windows can be opened at once.
4. Mastering Color in Photoshop
In Photoshop, there are multiple ways to understand color:
RGB Color Mode
Photoshop, by default, utilizes the RGB color mode. The acronym RGB stands for Red, Green, and Blue, which represent the primary colors used in this mode. Below are some key details about the RGB color mode:
- Primary Colors: The RGB color mode is based on the concept of using three primary colors—Red, Green, and Blue—to create a wide range of colors. These primary colors are combined in various intensities to produce different hues;
- Additive Color Model: RGB is an additive color model, meaning that the combination of different intensities of the primary colors results in the creation of new colors. When all three primary colors are fully combined at maximum intensity, the result is white. In contrast, when all three colors are absent or at their minimum intensity, the result is black;
- Digital Display: RGB is primarily used for digital displays such as computer monitors, televisions, and mobile devices. These devices emit light to produce colors, and the RGB color model is ideal for representing colors in this context;
- Wide Color Gamut: The RGB color mode offers a wide color gamut, meaning it can reproduce a vast range of colors. This capability is particularly beneficial for applications such as digital design, photography, and web development, where accurate color representation is crucial;
- 24-bit Color Depth: In RGB mode, each color channel (Red, Green, and Blue) is typically represented using 8 bits, resulting in a total of 24 bits. This allows for 256 intensity levels per channel, providing a total of over 16 million possible colors;
- Editing Flexibility: Photoshop’s use of RGB as the default color mode allows for extensive editing capabilities. The separation of colors into individual channels provides precise control over each primary color, enabling adjustments to hue, saturation, brightness, and other attributes independently.
CMYK Color Mode
The CMYK color mode is commonly used for print work and stands for Cyan, Magenta, Yellow, and Black. Below are the details of the CMYK color mode presented in a more detailed format, including bullet lists:
- Cyan, Magenta, Yellow, and Black: CMYK is an acronym that represents the four primary colors used in this color mode. These colors are Cyan, Magenta, Yellow, and Black (also known as Key). In CMYK, colors are created by subtracting light from the white background, as opposed to adding light in the RGB color mode;
- Subtractive Color Model: CMYK is a subtractive color model, meaning that the combination of different color intensities subtracts light to produce desired colors. In this mode, the more color is added, the darker the resulting color becomes. When all four colors are fully combined at maximum intensity, the result is black. In contrast, when all colors are absent or at their minimum intensity, the result is white;
- Print Reproduction: The CMYK color mode is primarily used in the print industry. Most printing processes, such as offset printing, utilize CMYK inks to reproduce colors on paper. By mixing different proportions of Cyan, Magenta, Yellow, and Black inks, a wide range of colors can be achieved in print;
- Color Subtleties: CMYK offers a broad range of colors and allows for precise control over color subtleties, making it suitable for achieving accurate color reproduction in print materials. It enables printing companies to match specific colors accurately, such as those used in logos or branding materials;
- 32-bit Color Depth: In CMYK mode, each color channel (Cyan, Magenta, Yellow, and Black) is usually represented using 8 bits, resulting in a total of 32 bits. This provides a color depth of over 4 billion possible colors, allowing for smooth color gradients and fine details in print;
- Color Conversion: When working with digital designs intended for print, it is essential to convert RGB images to CMYK to ensure accurate color representation. This conversion takes into account the differences in color gamut between RGB and CMYK, ensuring that the colors appear as intended in the final printed output.
Grayscale
Grayscale mode is a color mode that uses different shades of gray to represent images. In this mode, shades of gray ranging from white to black are used, with white representing the lightest shade and black representing the darkest. Here are some key details about the grayscale mode, presented in a detailed format with bullet points:
- Shades of Gray: Grayscale mode utilizes various shades of gray to represent the tonal values in an image. The absence of color in this mode simplifies the image to black, white, and all the shades of gray in between;
- Absence of Color: Unlike RGB or CMYK modes, which utilize primary colors to create a wide range of hues, grayscale mode only focuses on the tonal values and brightness levels of an image, disregarding color information;
- Simplicity and Contrast: Grayscale images can convey a sense of simplicity and elegance by stripping away color distractions. The use of different shades of gray enhances contrast and emphasizes the tonal variations within the image;
- Black and White Representation: In grayscale mode, black is used to represent the darkest areas of an image, while white represents the lightest areas. The shades of gray in between are used to depict the various levels of brightness and tonal details;
- 8-bit or 16-bit: Grayscale images are typically represented using either 8 bits or 16 bits per pixel. An 8-bit grayscale image provides 256 shades of gray, while a 16-bit grayscale image offers a much higher level of detail with over 65,000 shades of gray;
- Black and White Photography: Grayscale mode is often used to create black and white photographs, as it allows photographers to focus on composition, lighting, and tonal values without the distraction of color;
- Emphasis on Texture and Form: By removing color, grayscale mode emphasizes the textures, shapes, and forms within an image, allowing viewers to appreciate the fine details and tonal nuances.
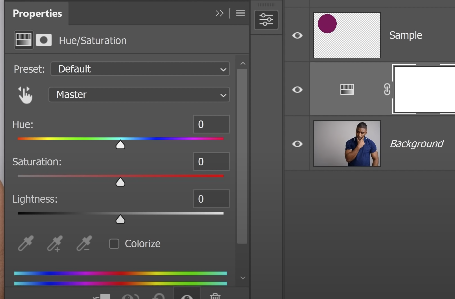
5. Exploring the Hue/Saturation Tool
The Hue/Saturation tool is an effective way to recolor an image in Photoshop. It allows you to adjust the overall color of the image or specific color ranges.
5.1 Recoloring the Entire Image
Here’s how you can recolor the entire image using the Hue/Saturation tool:
| Steps | Instructions |
|---|---|
| Step 1 | Click on Image in the menu bar. |
| Step 2 | Navigate to Adjustments, then select Hue/Saturation. |
| Step 3 | In the Hue/Saturation dialog box, adjust the Hue slider to change the color. Adjust the Saturation slider to change the intensity of the color. |
| Step 4 | Click OK when you are satisfied with the new color. |
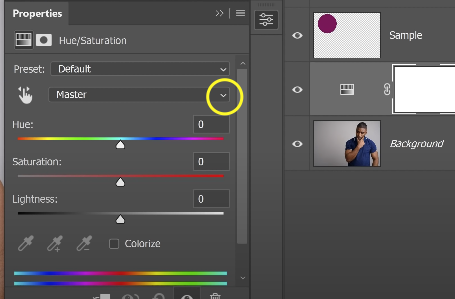
5.2 Recoloring a Specific Color
If you want to recolor a specific color in the image, here’s how to do it:
| Steps | Instructions |
|---|---|
| Step 1 | Click on Image in the menu bar. |
| Step 2 | Navigate to Adjustments, then select Hue/Saturation. |
| Step 3 | In the Hue/Saturation dialog box, click on the dropdown menu next to Master. This will let you select a specific color to adjust. |
| Step 4 | Select the color you want to recolor. |
| Step 5 | Adjust the Hue slider to change the color. Adjust the Saturation slider to change the intensity of the color. |
| Step 6 | Click OK when you are satisfied with the new color. |
6. Using the Color Replacement Tool
The Color Replacement Tool allows you to change specific areas in the image. Here’s how to use it:
| Steps | Instructions |
|---|---|
| Step 1 | In the Tools panel, select the Brush Tool. |
| Step 2 | Hold down the mouse button on the Brush Tool icon, and a menu will appear. |
| Step 3 | Select the Color Replacement Tool from the menu. |
| Step 4 | At the top of the screen, adjust the brush size, tolerance, and mode to your preference. |
| Step 5 | In the Foreground Color box at the bottom of the Tools panel, click and select the color you want to use. |
| Step 6 | Click and drag over the part of the image you want to recolor. |
7. Saving the Image
After you’ve recolored the image to your satisfaction, you need to save it. Here are the steps:
| Steps | Instructions |
|---|---|
| Step 1 | Click on File in the menu bar. |
| Step 2 | Select Save As. |
| Step 3 | In the dialog box, choose where you want to save the image and type in a file name. |
| Step 4 | Choose the format you want to save the image in, such as JPEG or PNG. |
| Step 5 | Click Save. |
Conclusion
Through this comprehensive guide, you have now learned how to recolor an image in Photoshop using the Hue/Saturation tool and Color Replacement Tool. These techniques are powerful tools in your Photoshop toolkit, allowing you to change the appearance of your images dramatically. Experiment and practice these steps to gain proficiency in recoloring and enhancing your images.