Mastering the Art of Exporting Multiple Photos in Photoshop
Adobe Photoshop, a leading editing tool in the graphic design industry, is a creative individual’s dream, boasting an extensive array of powerful functionalities. Among these is the ability to batch edit and export multiple images, a game-changing feature for those dealing with large quantities of photos. This article will guide you step-by-step on how to maximize this feature.
The Magic of Batch Processing
Step 1: Open Adobe Photoshop
Begin by launching Adobe Photoshop on your device. You can do this by clicking on the Photoshop icon on your desktop or in your applications folder, depending on your operating system.
| Operating System | Instructions |
|---|---|
| Windows | Go to Start > All Programs > Adobe Photoshop |
| macOS | Open Finder > Applications > Adobe Photoshop |
Step 2: Navigate to the ‘Automate Batch’ Function
After opening Adobe Photoshop, the next step is to navigate to the ‘Automate Batch’ function.
Here’s a step-by-step guide on how to find this function:
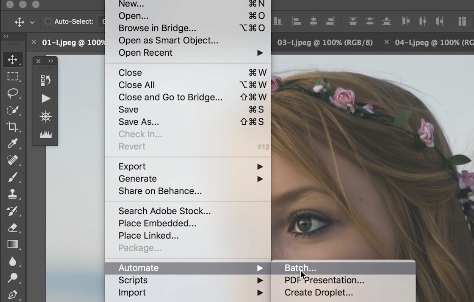
- Find the ‘File’ tab in the top left corner of the screen;
- From the drop-down menu, click on the ‘Automate’ option;
- A side menu will appear. From this, select ‘Batch’.
Step 3: Configure your Batch Settings
Once you’ve opened the ‘Batch’ window, you’ll be able to configure your settings according to your needs.
Below is a bullet-pointed list of the options available to you and what they do:
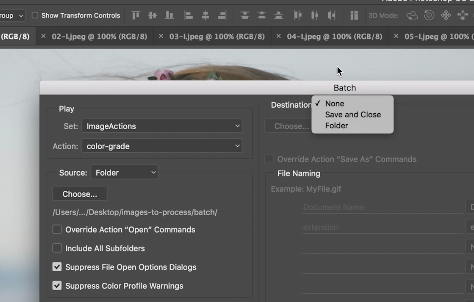
Play Section: This section allows you to choose which action you want to be performed. You can choose the ‘Set’ (which is the category of the action), and the specific ‘Action’;
Source: Here you can specify where the files you want to process are located. The options include ‘Folder’, ‘Import’, ‘Opened Files’, and ‘Bridge’;
Destination: This section allows you to choose where to save the processed files. It also gives you the option to override the ‘Save As’ commands in your Action.
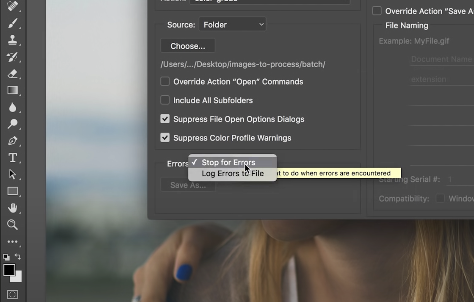
Errors: You can choose how Photoshop should respond if it encounters an error during processing. Options are ‘Stop for Errors’ or ‘Log Errors to File’.
Remember to click ‘OK’ once you have chosen all your settings to start the batch processing. After you’ve set everything up, Photoshop will take care of the rest, freeing you up to work on other tasks.
This functionality is extremely useful for performing repetitive tasks on multiple files, and once mastered, it can be a significant time-saver. Be sure to experiment with different settings and actions to find what works best for your particular needs.
Choose Set and Action
Step 1: Open Adobe Photoshop
Start by launching Adobe Photoshop on your device. Depending on your operating system, you can click on the Photoshop icon on your desktop or in your applications folder.
| Operating System | Instructions |
|---|---|
| Windows | Go to Start > All Programs > Adobe Photoshop |
| macOS | Open Finder > Applications > Adobe Photoshop |
Step 2: Navigate to the Image Processor
Once Adobe Photoshop is open, you can access the Image Processor by navigating through a sequence of menus.
Here’s a step-by-step guide:
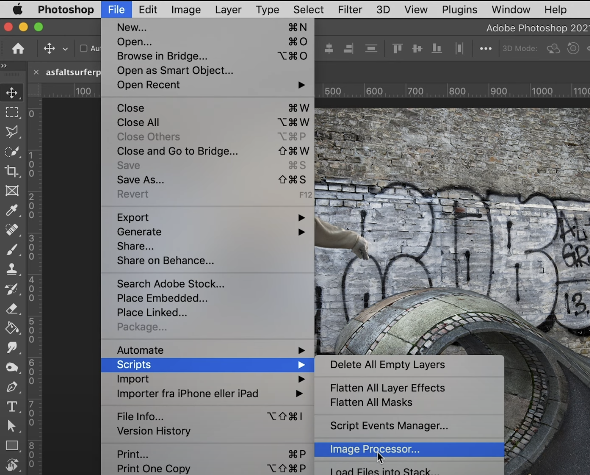
- Click on the ‘File’ tab located in the top left corner of the Photoshop window. This will open a drop-down menu;
- From the drop-down menu, select the ‘Scripts’ option. A side menu will appear;
- From this side menu, click on ‘Image Processor’.
Step 3: Using the Image Processor
Once you’ve clicked on ‘Image Processor’, a new dialog box will open. Here, you can select the images you want to process, specify how you want them to be processed, and where you want the processed images to be saved.
Accessing the Image Processor is the first step in efficiently resizing, converting, or performing other batch actions on your images. Its intuitive interface makes it an invaluable tool for those looking to save time while working with multiple images in Adobe Photoshop.
Navigate to the ‘Set’ and ‘Action’ Drop-Down Menus
In the Batch dialog box, you will notice a series of drop-down menus at the top. The first two are ‘Set’ and ‘Action’.
Here’s a detailed description of these two options:
| Batch Dialog Option | Description |
|---|---|
| Set | Corresponds to the folder where your saved actions are stored |
| Action | Refers to the specific tasks or steps to be applied to your images |
Select your ‘Set’ and ‘Action’
Batch processing in Adobe Photoshop is a powerful tool that allows you to apply the same adjustments or changes to a large number of images at once, thereby saving you a significant amount of time. Key to this process is the ‘Set’ and ‘Action’ options, which guide the software in performing your specified tasks. Here’s a detailed breakdown of how to select the ‘Set’ and ‘Action’ for your batch processing needs.
To start with, you will need to choose the appropriate ‘Set’. A ‘Set’ in Adobe Photoshop is a group of predetermined actions.
Table 1: Steps to select ‘Set’
| Step | Instruction |
|---|---|
| 1. | Locate the ‘Actions’ panel in Photoshop. If it isn’t visible, go to the ‘Window’ menu and select ‘Actions’. |
| 2. | In the ‘Actions’ panel, find the ‘Set’ drop-down menu. |
| 3. | Click on the ‘Set’ drop-down menu to view all available sets. |
| 4. | Select the set that contains the action you want to use for batch processing. |
After selecting the ‘Set’, you will need to choose the specific ‘Action’ within it that you want to apply to your batch of images.
Table 2: Steps to select ‘Action’
| Step | Instruction |
|---|---|
| 1. | After selecting the ‘Set’, move on to the ‘Action’ drop-down menu. |
| 2. | Click on the ‘Action’ drop-down menu to view all available actions within the selected set. |
| 3. | Select the specific action you wish to apply to your batch of images. |
Key Points to Remember
- Batch processing can save a significant amount of time, especially when you’re working with a large number of images that need the same adjustments or changes;
- ‘Set’ and ‘Action’ options are crucial for setting up batch processing in Adobe Photoshop;
- The ‘Set’ contains a group of predetermined actions, out of which you choose a specific ‘Action’ to apply to your batch of images.
Source Selection
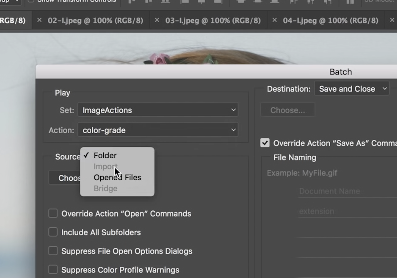
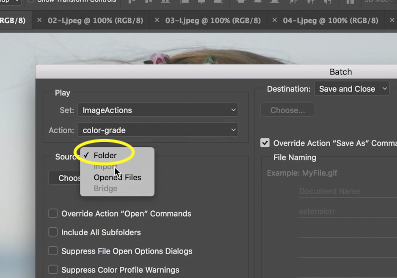
Step 1: Navigate to the ‘Source’ Drop-Down Menu
After you have selected your ‘Set’ and ‘Action’ for batch processing in Adobe Photoshop, the next crucial step is to select the source images on which you will apply the predetermined action. The ‘Source’ drop-down menu in the Batch dialog box is where you can select these images. Here’s a detailed guide to help you navigate to this menu.
Table 1: Steps to navigate to the ‘Source’ drop-down menu
| Step | Instruction |
|---|---|
| 1. | Open the ‘File’ menu from the toolbar at the top of the screen. |
| 2. | Navigate to the ‘Automate’ option, and select ‘Batch’ from the drop-down menu that appears. |
| 3. | In the Batch dialog box that pops up, you’ll find the ‘Source’ drop-down menu. |
| 4. | Click on the ‘Source’ drop-down menu to access all available options. |
Key Points to Remember
- The ‘Source’ drop-down menu is where you select your source images for batch processing;
- This step is crucial as it determines which images will be processed using the ‘Set’ and ‘Action’ you previously selected;
- You can access the ‘Source’ drop-down menu from the Batch dialog box in Adobe Photoshop.
By following these steps, you can successfully select the source of your images for batch processing in Adobe Photoshop. This not only streamlines the process but also ensures that your selected action is applied uniformly across all selected images, thereby maintaining consistency and enhancing productivity.
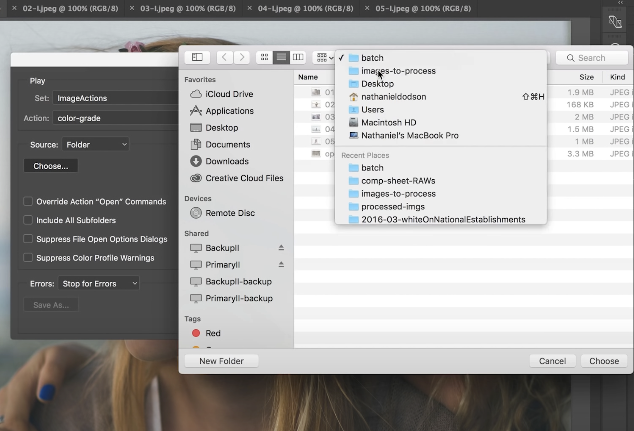
Step 2: Choose the Source Folder
The second step in batch processing using the Image Processor in Adobe Photoshop involves choosing the source folder that contains the images you want to process. Here’s a detailed guide on how to navigate to this folder and select it as your source.
Table 1: Steps to choose the Source Folder
| Step | Instruction |
|---|---|
| 1. | In the Image Processor dialog box, click on the ‘Select Folder…’ button next to ‘Select the images to process’. |
| 2. | A file dialog box will open, allowing you to navigate through your computer’s file system. |
| 3. | Locate the folder containing the images you want to process. This folder can be located anywhere on your computer’s hard drive. |
| 4. | Click on the desired folder to select it, and then click ‘OK’ to confirm your selection. |
Key Points to Remember
Choosing the correct ‘Source’ folder is crucial as it determines which images will be processed.
You can access the source folder selection from the Image Processor dialog box in Adobe Photoshop.
The source folder can be located anywhere on your computer’s hard drive.
Step 3: Leave the ‘Override Action “Open” Commands’ Checkbox Unchecked
- Just below the ‘Source’ drop-down menu, you’ll notice a checkbox titled ‘Override Action “Open” Commands’. This option, if checked, would override the “Open” commands that are stored in your chosen Action;
- However, for batch processing, it is generally recommended to leave this box unchecked. This ensures that Photoshop will open each image individually in the chosen source folder and apply the specified Action to each one.
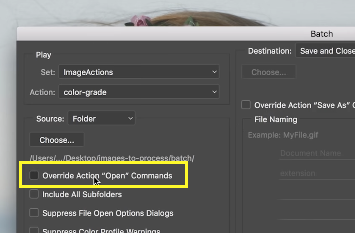
| Batch Dialog Checkbox | Recommended Setting |
|---|---|
| Override Action “Open” Commands | Unchecked |
Choosing the right source images is a crucial step in batch processing. Making sure your images are correctly sourced will ensure the process runs smoothly and your chosen actions are applied correctly to each image.
Step 4: Destination Selection and Naming
Next, select where you want your processed images to be saved.
- Choose ‘Destination’ and select the folder where you want your edited images to be placed;
- In the ‘File Naming’ section, customize how Photoshop will name your processed images. You can use a combination of document names, serial numbers or letters, or dates.
| File Naming Option | Description |
|---|---|
| Document Name + Extension | Uses the original file name |
| Document Name + Serial Number + Extension | Adds a sequential number to the original file name |
| Document Name + Serial Letter + Extension | Adds a sequential letter to the original file name |
| Document Name + Date + Extension | Adds the date to the original file name |
A Smooth and Efficient Workflow: The Image Processor
While the ‘Automate Batch’ function is fantastic for applying pre-saved actions to a group of images, the Image Processor provides a straightforward way of converting and saving a batch of images.
1. Locate and Open Image Processor
The Image Processor in Adobe Photoshop is an invaluable tool that allows you to convert and process multiple files at once, saving time and ensuring consistent image processing. Here’s a detailed guide on how to locate and open the Image Processor.
Table 1: Steps to locate and open Image Processor
| Step | Instruction |
|---|---|
| 1. | From the toolbar at the top of the screen, click on the ‘File’ menu. |
| 2. | From the ‘File’ drop-down menu, select ‘Scripts’. |
| 3. | Within ‘Scripts’, locate and select ‘Image Processor’. |
| 4. | The Image Processor dialog box will appear, ready for use. |
2. Select Images to Process
The second step in using the Image Processor in Adobe Photoshop is to select the images you want to process. This can be done in the Image Processor dialog box, which provides two options to choose from. Here’s a detailed guide on how to do this.
Table 1: Options to select images to process
| Option | Instruction |
|---|---|
| Use Open Images | If you choose this option, Photoshop will process all the images currently open in the application. To select this, simply check the box next to ‘Use Open Images’ in the first section of the Image Processor dialog box. |
| Select Folder | This option allows you to select a specific folder from your computer’s hard drive. Photoshop will process all images within the chosen folder. To select this, click on the ‘Select Folder…’ button in the first section of the Image Processor dialog box and navigate to your desired folder. |
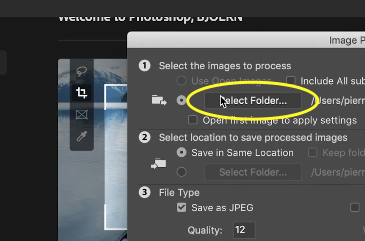
3. Select Location to Save Processed Images
The third step when using the Image Processor in Adobe Photoshop is to select the location where you want your processed images to be saved. You have two options in the second section of the Image Processor dialog box. Here’s a detailed guide on how to do this.
Table 1: Options to select the save location for processed images
| Option | Instruction |
|---|---|
| Save in Same Location | If you select this option, Photoshop will create a subfolder in the original location of your images and save the processed images there. To select this, simply check the box next to ‘Save in Same Location’ in the second section of the Image Processor dialog box. |
| Select Folder | This option allows you to specify a different folder on your computer’s hard drive where you want your processed images to be saved. To select this, click on the ‘Select Folder…’ button in the second section of the Image Processor dialog box and navigate to your desired folder. |
4. File Type Selection
In the third section, you decide the file types for your processed images. Photoshop offers JPEG, PSD, and TIFF options. You can select one or more and set the quality or specifications for each.
5. Preferences
In the final section, you can run an action, resize images, or include copyright information.
- Run Action: If you have an action you want to be applied to all images, select the set and the action;
- Resize to Fit: This allows you to change the size of all images;
- Include ICC Profile: This includes color data in your processed images.
Click ‘Run’ and watch as Photoshop processes all your images.
Conclusion
Mastering the art of exporting multiple photos in Adobe Photoshop is a valuable skill that can significantly improve the efficiency and productivity of graphic designers and creative individuals. Whether using the “Automate Batch” function or the “Image Processor” tool, Photoshop provides powerful features that simplify the process of editing and exporting large quantities of images. By following the step-by-step instructions provided in this article, users can streamline their workflow, save time, and focus more on their creative vision.
By leveraging the batch processing capabilities of Photoshop, users can apply pre-saved actions, select source images, specify destination folders, and customize file naming options. Additionally, the Image Processor offers a user-friendly alternative for converting and saving a batch of images with options for file types, resizing, and including additional information. With these tools at their disposal, graphic designers can optimize their editing workflow and achieve remarkable results while handling multiple photos simultaneously.