Mastering the Art of Layer Cropping in Photoshop: Essential Methods
Ready to elevate your Photoshop prowess and unlock a realm of design possibilities? Mastering the art of effective layer cropping can take your creations to soaring new heights. Whether you’re a visual storyteller, photographer, or graphic designer, the ability to crop layers in Photoshop is a fundamental skill that opens doors to a world of endless creativity.
In this enlightening article, we’ll dive deep into the realm of layer cropping, uncovering essential techniques that empower you to unleash your artistic vision and revolutionize your designs. Join us on this journey as we unravel the secrets of precision cropping, unveiling invaluable tools and strategies that supercharge your workflow and empower you to craft awe-inspiring visuals.
How to Crop a Layer in Photoshop?
The crop tool in Photoshop can be confusing for new users as it often crops the entire canvas instead of a single layer. However, fret not, as we will explore a few effective techniques to crop a specific layer in Photoshop, including converting the layer into a smart object and utilizing a layer mask.
Professional photographers often rely heavily on Photoshop as an essential tool in their workflows. This versatile application not only facilitates image retouching and post-processing of RAW files but also empowers them to create captivating collages and imaginative digital paintings that seamlessly blend reality with fantasy.
By cropping layers independently, a world of possibilities opens up, including the creation of eye-catching posters, seamless image replacements, and the design of compelling photo stories.
That said, there are several methods you can use:
- The first method involves converting the layer into a smart object, which allows for non-destructive editing;
- The second method utilizes a layer mask, providing precise control over the cropping area;
- The third method implies utilizing the crop tool with the “Delete Cropped Pixels” option, enabling you to remove unwanted areas while preserving the original layer.
Each of these methods offers unique advantages, empowering you to achieve the desired cropping results in Photoshop. Let’s consider each of the methods in detail.
Method #1: Crop a Layer by Converting to Smart Object and Using the Crop Tool
Photoshop is a powerful tool for image manipulation, and cropping a layer is a common task in many design projects. However, new users often find the crop tool perplexing as it tends to crop the entire canvas instead of a single layer.
Here is a step-by-step guide to cropping a layer in Photoshop by converting it to a smart object and using the crop tool:
Step 1: Prepare the Project
Initiate Photoshop and either open an existing multilayered project or create a new one. Upon opening an image, it will initially appear as the background layer. To transform it into a regular layer, double-click on the background layer, which will trigger a dialogue box for creating a new layer. Assign a name to the layer or proceed with the default name by pressing Enter.
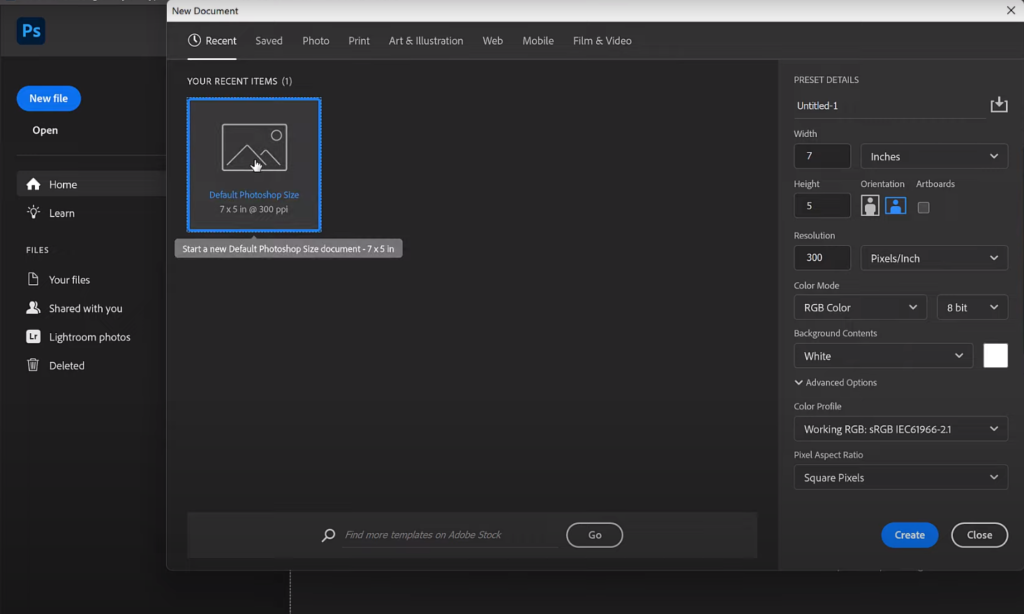
Alternatively, if you have multiple images, drag them into the project window, and each image will automatically become a new layer. Prior to adding the images, you will be provided with an opportunity to resize them.
Step 2: Select the Layer to Crop
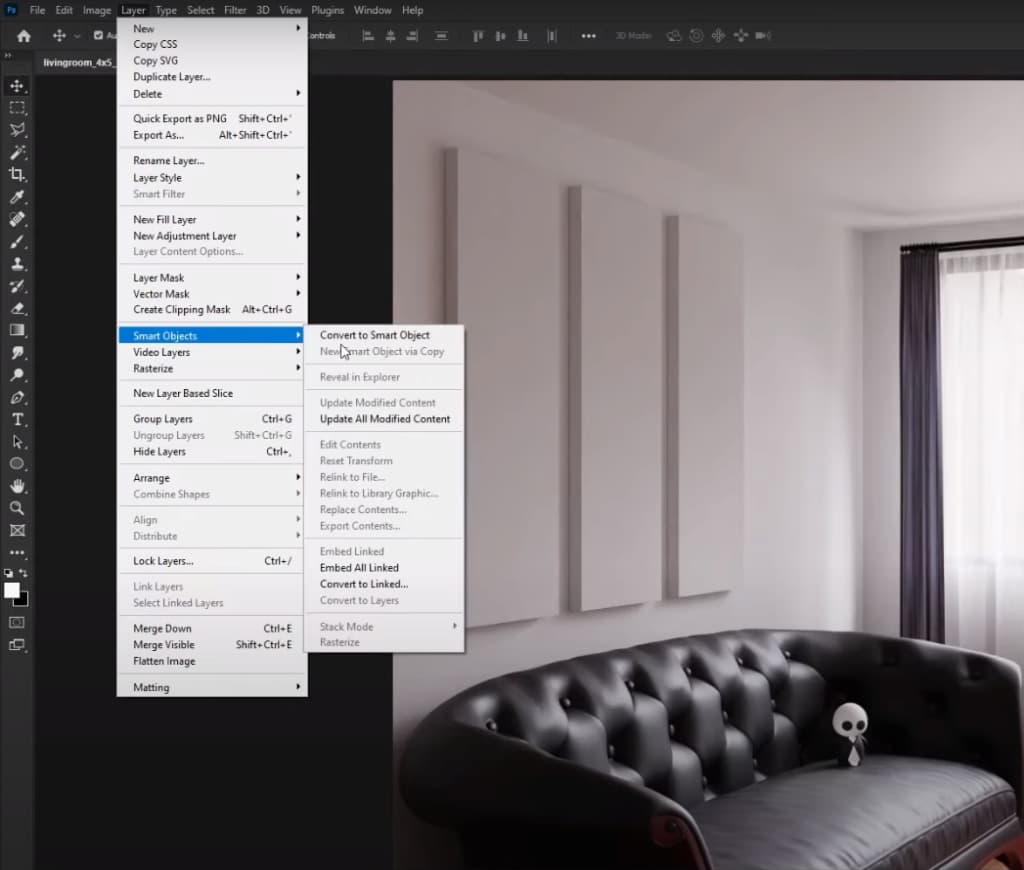
Right-click outside the thumbnail of the layer that you intend to crop. This action will bring up a context menu.
Step 3: Convert to Smart Object
From the context menu, opt for the “Convert to Smart Object” function. As soon as you click on it, an additional icon will manifest in the lower right corner of the layer thumbnail, signifying its transformation into a smart object.
Step 4: Access the Smart Object
Double-click on the layer thumbnail, which will generate a new tab containing only the selected layer.
Step 5: Utilize the Crop Tool
Employ the regular crop tool, either by selecting it from the toolbar or utilizing the keyboard shortcut “C,” to crop the image according to your preferences.
Step 6: Save and Close
Preserve your modifications by using the keyboard shortcut Ctrl+S (Windows) or Cmd+S (Mac) to save. Subsequently, close the tab by pressing Ctrl+W (Windows) or Cmd+W (Mac), and you will be redirected to the main project window.
Step 7: Observe the Cropped Layer
In the main project window, the smart object layer you chose will now reflect the cropping adjustments made in the separate tab.
Step 8: Repeat the Process (if necessary)
If you require cropping additional layers, replicate the aforementioned steps for each layer in question.
Tip: Bear in mind that although you can undo this action within the main project window, it will not be possible to readjust the crop once the changes are saved. Saving the modifications effectively eliminates the cropped-out area (unless you opt to undo the entire process).
By following these unique and straightforward instructions, you will be able to effectively crop layers in Photoshop to achieve your desired outcomes.
Method #2: Crop a Layer in Photoshop by Using a Layer Mask
In this section, we will explore the process of cropping a layer in Photoshop using a Layer Mask. This technique provides flexibility and non-destructive editing, ensuring that you can refine your crops with ease.
Follow the step-by-step instructions below to take your editing skills to the next level.
Step 1: Prepare the Project
Begin by launching Photoshop and either opening an existing project with multiple layers or creating a new one. Ensure that the project is set up according to your requirements.
Step 2: Select the Layer for Cropping
Identify the specific layer that needs to be cropped and ensure that it is actively selected.
Step 3: Create a Selection
Utilize tools such as the marquee tool or the lasso tool to precisely define a selection around the area you wish to retain after the cropping process.
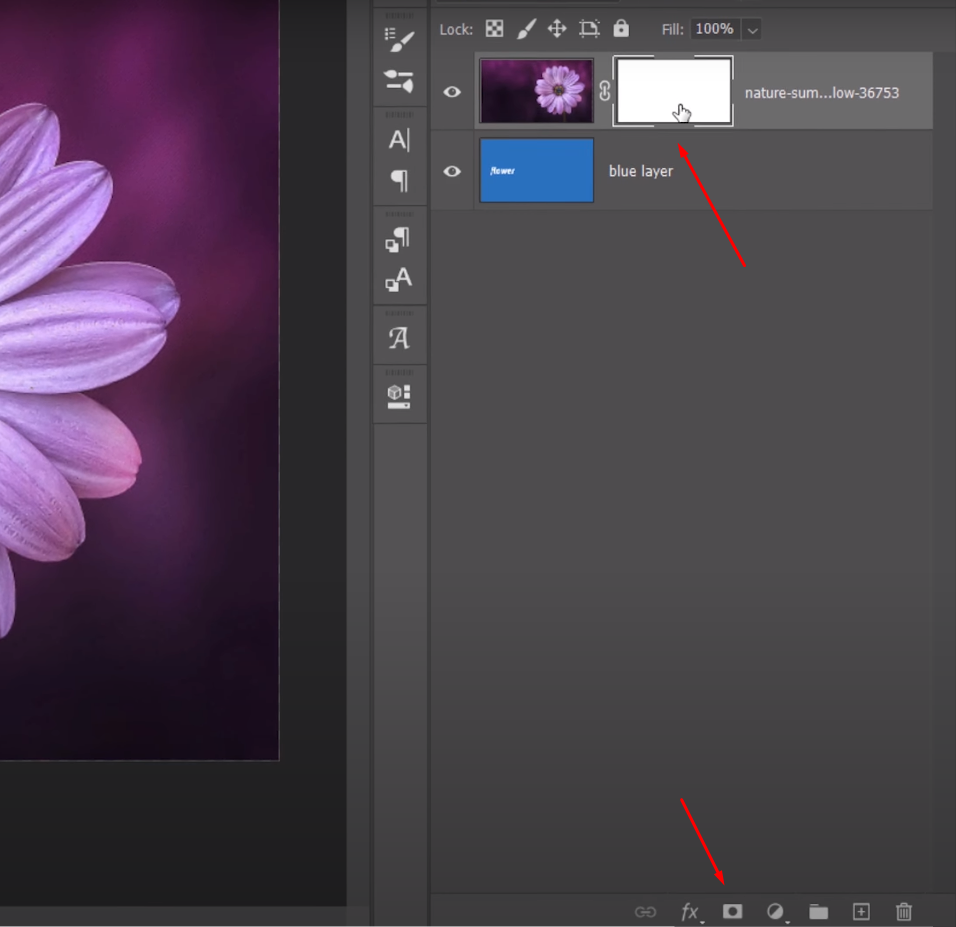
Step 4: Apply the Layer Mask
Confirm that the appropriate layer is still highlighted and proceed to click on the mask icon, which resembles a rectangle enclosing a circular shape. By applying the layer mask, everything outside of the selected area will be hidden, allowing you to manipulate the cropped layer by resizing and repositioning it as desired.
Tip: It’s worth noting that you have the option to invert your selection before applying the layer mask. To do this, press SHIFT+CTRL+I on Windows or SHIFT+CMD+I on Mac. The resulting mask will conceal the initially selected area instead.
Additionally, you can easily refine the crop by adjusting the selection itself. To do this, consider these next steps:
- Select the specific mask that requires adjustments by clicking on its thumbnail located adjacent to the layer thumbnail;
- Access the properties panel, which will display the available options once the mask is selected. If the panel is not already visible, you can add it to your workspace by navigating to Window > Properties from the menu bar;
- Within the properties panel, the feather option enables the addition of soft edges to the mask, while the density option allows you to control the opacity of the concealed areas behind the mask. The refine option opens a separate dialogue box that provides more advanced controls, which can be particularly useful for intricate selections, such as extracting hair from a background.
Tip: Before applying the mask, it is possible to further modify the selection itself to alter the resulting mask. This can be achieved using various selection tools, including the lasso tool, polygonal lasso tool, or marquee tool.
Here’s how you can do it:
- Access the menu bar and navigate to Select > Reselect, or use the shortcut SHIFT+CTRL+D (Windows) or SHIFT+CMD+D (Mac). This action will reactivate the selection that defines the shape of the mask. You will observe the familiar black and white “marching ants” outlining the selection;
- Utilize the desired selection tool mentioned earlier to add or subtract areas from the existing selection. The Options panel, accessible through the Window menu (Window > Options), provides additional settings for modifying the behavior of the selected tool;
- You can choose to add to the selection, subtract from it, intersect with it, or create a completely new selection. To switch between these modes while using the tool, hold down the SHIFT key to add to the selection or hold down the ALT key (Windows) or Option key (Mac) to subtract from the selection. The tool cursor will display a corresponding symbol (+, -, or x) to indicate the currently active mode.
By following these step-by-step instructions, you can effectively crop a layer in Photoshop using a layer mask.
Method #3: Crop a Layer Using a Pre-made Custom Shape
While converting a layer to a smart object and using the Crop tool is a popular method, there are instances where you might need more flexibility, such as cropping into a custom shape.
In this section, we will explore the step-by-step process of cropping a layer in Photoshop using a pre-made custom shape. This technique allows you to create unique and precise crops, making it ideal for various design projects.
Let’s discover how to crop a layer into a custom shape using Photoshop’s powerful tools.
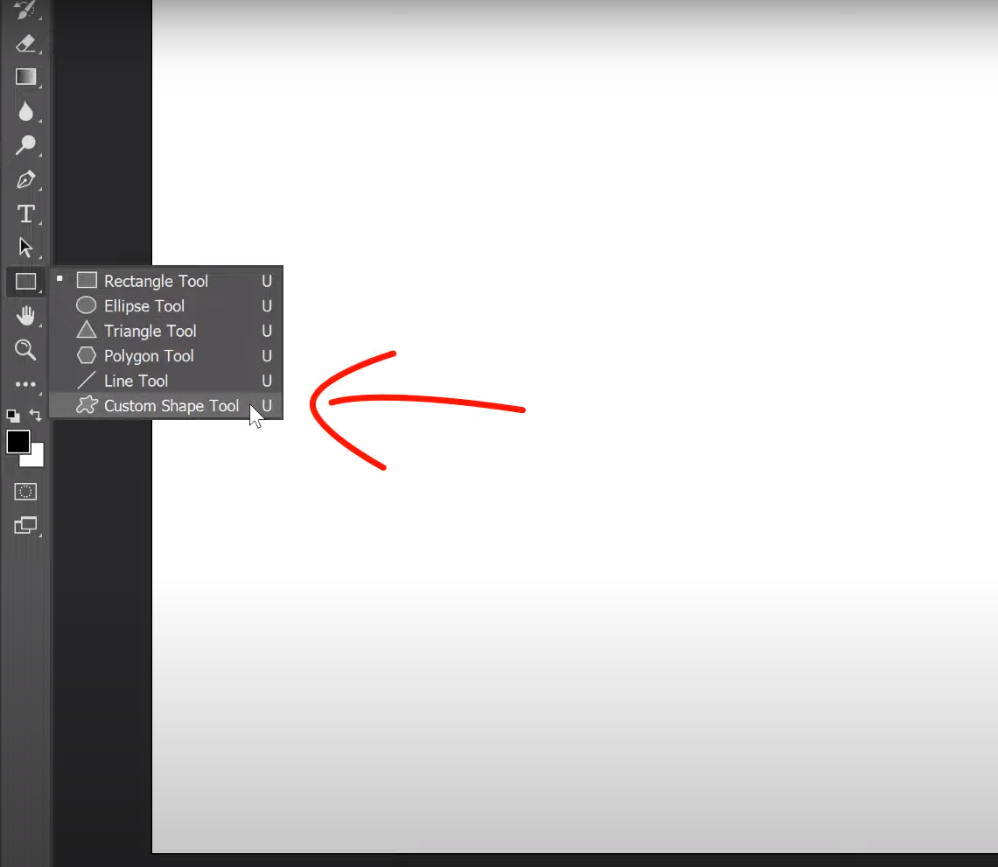
Step 1: Access the Custom Shape Tool
To begin, select the Shape Tool from the toolbar and click and hold on the tool until a menu appears. Choose the “Custom Shape” option or simply press SHIFT+U on your keyboard to activate the Custom Shape Tool.
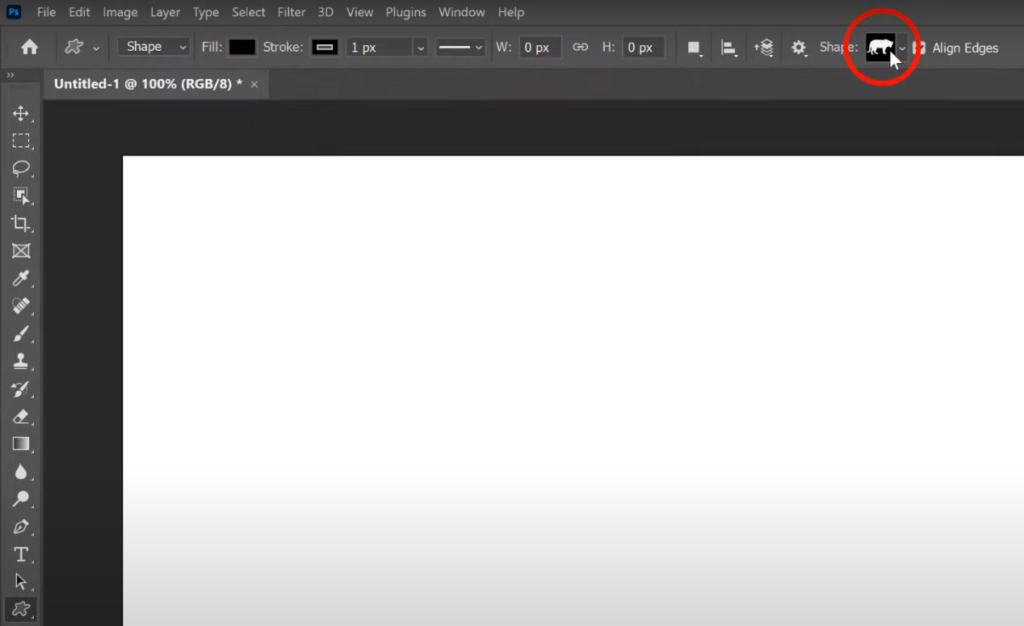
Step 2: Choose and Import Custom Shapes
You’ll find a drop-down menu in the Options panel. This is where you can select a custom shape. Additionally, you have the option to import your own custom shapes by clicking on the small cog icon and choosing “Import Shapes” from the menu.
Step 3: Draw the Custom Shape
Click and drag on the canvas to draw the selected custom shape. As you do this, Photoshop will automatically create a new shape layer to hold the shape you’ve drawn.
Step 4: Layer Arrangement
In the Layers panel, rearrange the layers so that the layer containing your picture is positioned above the custom shape layer. This ensures that the picture layer will be cropped into the custom shape.
Step 5: Create the Clipping Mask
Right-click on the layer you wish to crop, ensuring that you right-click outside the thumbnail of the layer. A menu will appear, and from there, select “Create Clipping Mask.” This action will crop the image into the custom shape, utilizing the layer arrangement from the previous step.

Tip: Note that this method does not work with smart objects. If your layer is a smart object, you need to rasterize it before applying the custom shape. To independently adjust masks and layers, click on the chainlink icon between the layer and mask thumbnails. This will unlink the mask from the layer, allowing you to freely move and transform each element as needed.
Conclusion
While converting layers to smart objects and using the Crop tool provides a straightforward cropping method, using a layer mask with a custom shape offers more creative possibilities. This technique allows you to quickly crop layers into unique shapes and provides infinite adjustability for precise refinements.
By following the steps outlined in this guide, you’ll have the knowledge and tools to crop layers into custom shapes in Photoshop. We encourage you to experiment with these techniques and unleash your creativity.