
Mastering the Using of Alpha Lock in Photoshop
As a graphic designer, the capability to optimize your workflow is essential. This is where Photoshop, a go-to tool for professionals in the industry, steps in. It boasts a wide array of features designed to make your design process smoother and more efficient. Among these numerous features, one stands out due to its practical utility and transformative potential – the Alpha Lock.
Alpha Lock is a robust feature that grants you the power to adjust only the visible pixels within a layer. The mastery of this tool can dramatically enhance your Photoshop skill set, unlocking new possibilities for creating intricate designs. The beauty of Alpha Lock lies in its ability to let you make alterations without compromising the fundamental elements of your original layer. Therefore, it enables you to venture into complex design territories while keeping your base layer intact.
Understanding Alpha Lock
Alpha Lock, often interchangeably called “Transparency Lock”, is a Photoshop function designed to help artists and graphic designers control the visibility of pixels in a layer. It operates by restricting changes to opaque areas, leaving transparent sections of a layer untouched. This feature is beneficial for several reasons:
- It offers an effective way to manage detailed areas without affecting the background;
- It allows for artistic enhancements and edits to specific sections of an image;
- It provides a non-destructive editing approach, maintaining the original image’s integrity.
To understand how Alpha Lock operates, it’s essential to grasp the concept of alpha channels. Essentially, an image comprises various color channels—Red, Green, and Blue (RGB). Beyond these, there is an ‘Alpha Channel’ that controls the transparency level of an image. An alpha channel value of ‘0’ indicates complete transparency, while ‘255’ denotes full opacity.
How to Enable Alpha Lock in Photoshop
Activating the Alpha Lock feature in Photoshop is an effortless process:
1. Open your image file in Photoshop.
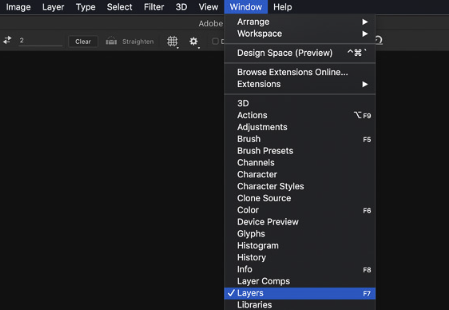
2. Navigate to the ‘Layers’ panel. If it’s not visible, go to ‘Window’ and click ‘Layers’.
3. Select the layer you wish to apply the Alpha Lock to.
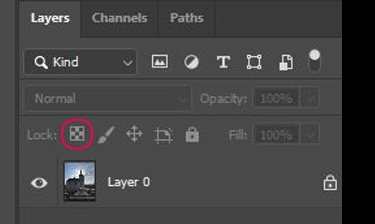
4. At the top of the ‘Layers’ panel, click on the ‘Lock Transparent Pixels’ icon (a square grid with a checkerboard pattern).
Remember, the ‘Lock Transparent Pixels’ option will be grayed out if you’re working with a Background layer. To activate the option, double-click the layer and then click ‘OK’ in the New Layer dialog box. This action converts the background into a regular layer.
Utilizing Alpha Lock in Your Design Workflow
Alpha Lock offers you the creative liberty to experiment with your designs. Here are some practical applications:
| Feature | Description |
|---|---|
| Color Shading and Highlighting | With Alpha Lock, you can add different color shades to an existing image layer without spilling over the lines. This technique is especially useful in digital painting and comic coloring. |
| Creating Gradient Effects | You can apply gradient effects to specific parts of an image. For instance, if you want a word to have a gradient effect, write the word, activate Alpha Lock on the text layer, and apply your gradient. |
| Texturing | Alpha Lock allows you to apply textures to only visible parts of an image. Suppose you want to add a texture to text; you can do so without affecting the text’s transparency. |
| Image Detailing | If you want to add intricate details to an illustration, Alpha Lock helps ensure these details don’t extend beyond the original shape. |
Some Alpha Lock Limitations
Despite its merits, Alpha Lock does come with some limitations:
No Locking for Hidden Pixels
If a pixel is hidden behind another object, Alpha Lock won’t protect it. This issue can cause problems if you’re working on a complex piece with many overlapping elements. It’s important to be mindful of this limitation and ensure the proper arrangement of layers to avoid unexpected changes to hidden pixels.
Opacity Limitations
Alpha Lock does not lock the opacity of a layer. Thus, you can still change the overall opacity, affecting both transparent and opaque pixels. This can be a drawback when you need to preserve specific opacity settings for certain elements within a layer, requiring additional manual adjustments to maintain desired transparency levels.
Locked to a Specific Layer
Alpha Lock is layer-specific, meaning you have to apply it individually to each layer you wish to protect. This can be time-consuming and cumbersome, especially when working with a large number of layers. It’s important to remember to apply Alpha Lock to each relevant layer to ensure the desired protection and avoid accidental modifications.
Conclusion
Despite these constraints, the Alpha Lock feature remains a crucial asset in Photoshop’s toolbox. It offers a distinct level of control over your design elements, making it an indispensable feature for both novice and professional graphic designers.
Understanding how to effectively utilize the Alpha Lock feature will enhance your Photoshop skill set, allowing you to take your graphic design projects to the next level. It provides a simpler way of editing visible pixels, without altering the transparent ones, thereby safeguarding the integrity of your original artwork. By mastering this tool, you can truly unleash your creative potential in Photoshop.