Navigating Color Duplication in Procreate
Procreate is widely recognized as an exceptional digital painting application that provides a plethora of distinctive tools and functionalities tailored to artists of all proficiency levels. Among its impressive array of features is the capability to duplicate colors from one element and seamlessly apply them to another. This remarkable ability not only streamlines the artistic process but also ensures consistency throughout the artwork. Although the process may appear daunting for beginners, there’s no need to worry.
This comprehensive guide aims to demystify the method of duplicating colors in Procreate, making it accessible and straightforward for all users.
Step 1: Accessing the Eyedropper Tool
The Eyedropper tool, which is essential for color copying in Procreate, is cleverly integrated into the interface, making it effortlessly accessible. Follow these steps:
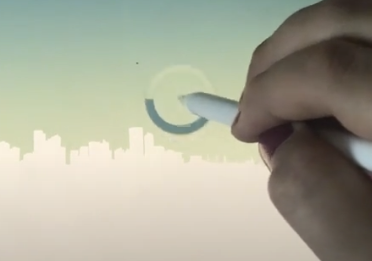
- Start by touching your canvas with one finger/stylus;
- Without lifting your finger/stylus, observe a circular magnifier appearing on your screen. This feature helps pinpoint the exact color you want to copy;
- Drag your finger/stylus to the spot with the desired color. The magnifier assists in selecting the precise color pixel.
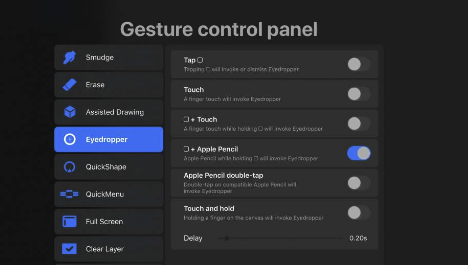
Step 2: Adjusting the Eyedropper Tool
One of the overlooked aspects of the Eyedropper tool is its ability to be fine-tuned. These steps guide you in adjusting its settings:
- Navigate to the “Actions” menu, represented by a wrench icon;
- Select the “Prefs” tab and look for the “Eyedropper Delay” slider;
- Moving the slider towards ‘None’ speeds up the Eyedropper’s response, while moving it towards ‘Max’ slows it down, providing more control over color selection.
Step 3: Storing the Copied Color
After selecting your desired color, the next step involves saving it for future use. Here’s how:
Notice that the color you picked with the Eyedropper tool is now displayed in the color disk, found at the top-right corner of the screen.
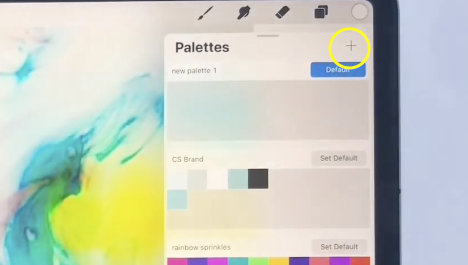
Tap on the color disk to open the color menu
From the menu, select the square on the top right, termed the “Color Palettes”.
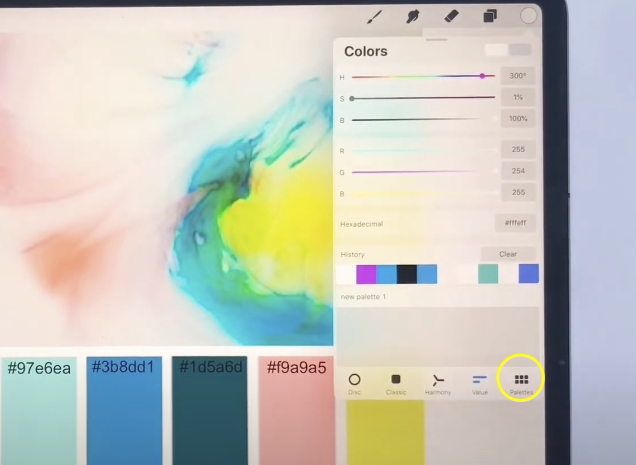
By clicking on the ‘+’ icon, a new color palette can be created, or you can add the copied color to an existing palette by tapping any of the empty squares.
Step 4: Applying the Copied Color
Finally, after you’ve successfully copied and stored your color, it’s time to put it to use. Follow these steps:
- From the color menu, select the square denoting “Color Palettes”;
- Choose the palette where you saved the copied color;
- By tapping on the color square, the selected color becomes your current color;
- Now, you can use the selected color in your artwork as desired.
Additional Tips
Now that we’ve covered the basics, let’s delve into some additional tips that can further enhance your experience with Procreate’s color copying feature.
| Feature | Description |
|---|---|
| ColorDrop Feature | This feature allows you to quickly and efficiently fill large areas with a specific color. Simply drag the color from the color disk and drop it onto the desired area on your canvas. |
| Recolor Option | The Recolor option enables you to change the color of a specific area without affecting the rest of your artwork. Access it from the Adjustments menu (represented by a magic wand icon) to have precise control over color changes. |
| QuickMenu | QuickMenu provides a faster way to access your favorite functions, including the Eyedropper tool. Customize it in the Actions menu, under the “Prefs” tab, to conveniently access frequently used tools. |
| Continuous Color Sampling | With continuous color sampling, you can press and hold your Apple Pencil or finger on the canvas to enable real-time color changes. This feature allows you to explore different shades and find the perfect color for your artwork. |
Conclusion
The process of duplicating colors in Procreate offers a remarkable advantage in streamlining your digital artwork workflow. By effortlessly copying, storing, and applying colors, you can ensure consistency in your creations and enhance your overall efficiency. To make the most of this functionality, it’s essential to become proficient in utilizing the Eyedropper tool and familiarize yourself with other helpful features such as ColorDrop, Recolor, QuickMenu, and continuous color sampling.
With these tools at your disposal, you’ll gain a comprehensive understanding of color management in Procreate, empowering you as an artist to unleash your creative potential. This feature-rich digital painting application truly serves as a powerful ally for artists of all levels.