Procreate’s Custom Brushes: A Comprehensive Mastery Guide
Welcome to the expansive universe of Procreate, an arena where your imagination is the only limit. Possessing a cornucopia of customizable brush tools, you are not just an artist—you become an architect of creativity, a virtuoso in the digital art world, armed with the capability of designing distinctive drawing tools that resonate with your artistic impulses.
This guide serves as your compass, charting a course through the intricate intricacies of sculpting personalized brushes in Procreate. We aim to decode the mystique of stroke paths, settings, and dynamics, thereby illuminating the path toward an enriched digital art journey. Unfurl the map, ready your stylus, and prepare to embark on an adventure that promises to revolutionize your Procreate experience.
Cultivating Proficiency in Personalized Brush Development in Procreate
Procreate’s dynamic sphere is a fertile ground for cultivating an artist’s creativity. The various tools available within the app serve as artistic mediums, the most versatile among them being the brushes. The process of creating customized drawing tools is not simply about devising new tools; it’s about personalizing the Procreate interface to serve as a seamless extension of your own artistic style and vision.
To embark on this voyage of tailored brush development:
- Activate the Procreate app on your device and make your way to the rich collection of drawing tools stored within the brush library;
- Identify the “+” icon situated in the upper-right portion of your screen and tap on it to reveal the extensive brush settings panel;
- As you step into this realm of customization, you find yourself poised to create a tool that will faithfully cater to your artistic inclinations within Procreate. The journey involves fine-tuning a wide array of brush settings such as Stroke Path, Stabilization, Taper, Shape, Grain, Rendering Options, Wet Mix, Color Dynamics, Dynamics, Apple Pencil settings, and Properties. Each of these individual elements contributes to the creation of your bespoke brush.
Expert Tip: Always approach the process of tailored brush creation with an exploratory mindset. This is your canvas for innovation and the birthplace of unique digital art tools. Take risks, venture beyond the conventional, and invite transformation by incorporating daring modifications. This creative play will not only lead to the development of unique tools but also contribute to your growth as a digital artist.
Delving deeper into custom brush creation, it’s imperative to understand that the process is iterative and involves a learning curve. It’s recommended to play with different combinations of settings and observe how each tweak impacts the drawing tool’s behavior. As you progressively shape your tool, you’ll realize that every brush you create becomes a testament to your artistic evolution, each reflecting your refined skills and matured preferences.

Moreover, remember that each new brush can serve as a foundation for future ones. As you save your creations, you can easily revisit and revise them, adding new features or fine-tuning existing ones. This approach aids in maintaining continuity in your artistic style while keeping the process of drawing tool creation efficient and streamlined.
In this captivating process, you’re not only crafting a tool but also defining the medium of your artistic expression in the digital domain. By mastering the art of custom drawing tool creation in Procreate, you’re elevating your digital art skills to a whole new level, one that aligns seamlessly with your unique artistic vision and aspirations.
Decoding the Brush Settings in Procreate
Venturing into the myriad brush settings in Procreate can be compared to uncovering a rich tapestry of options, each weaving a distinct thread into the fabric of your paint tool’s identity. These configurations serve as the regulatory mechanisms, guiding the paint tool’s execution and paving the way for a spectrum of textures and effects.
Let’s unfurl these configurations:
- Stroke Path: Acting as the paint tool’s compass, this element directs its journey across the canvas, instilling a characteristic tempo and fluidity to your strokes, thereby mirroring the hand’s movement;
- Taper: This configuration tailors the gradual decrease in paint tool size, opacity, and other factors at the tail ends of the stroke, bestowing a lifelike touch to your digital artwork;
- Shape: As the name suggests, this configuration shapes the overall visual appeal and style of your strokes, playing a crucial role in the aesthetic charisma of your paint tool;
- Grain: This parameter supervises the texture integrated into your strokes, introducing an element of depth and intricacy that enriches the overall look and feel of your art;
- Rendering Options: These choices mediate the rapport between shape and grain, coalescing to craft the final appearance of the paint tool stroke.
By meticulously interpreting and adjusting these configurations, you gain a comprehensive understanding and control over your Procreate paint tool, propelling your digital art journey.
Expert Tip: Adopt an approach of incremental adjustments while tinkering with settings. Small modifications can instigate significant shifts in your paint tool’s characteristics. Additionally, it’s worthwhile to invest time in understanding the implications of each setting change, as this knowledge will aid in fine-tuning your future creations.
Furthermore, remember to document your process. Taking note of specific settings that helped achieve certain effects will serve as a valuable resource for future work. The world of Procreate paint tools is vast, and maintaining a record of your experiments and discoveries will allow you to navigate it with increased confidence and proficiency.
With these insights, you are well-equipped to embark on the exciting adventure of Procreate paint tool customization. Your willingness to explore, experiment, and evolve will not only enhance your digital painting experience but also contribute significantly to your growth as a digital artist. So, dive in, get creative, and discover the unique paint tools waiting to come alive under your guidance.
Creating Diverse Tools: Stamp and Pixel Brushes
Procreate offers a universe of customizable drawing instruments in harmony with your creative spirit, prominently featuring impression and bit-rendered tools, each bringing a singular flavor to your artwork.
The Stamp Brush: This tool variant stamps a predetermined pattern or design onto your digital canvas, instilling an intriguing texture or thematic element into your creative output.
To shape an impression tool:
- Kickstart the creation process by initializing a new drawing instrument;
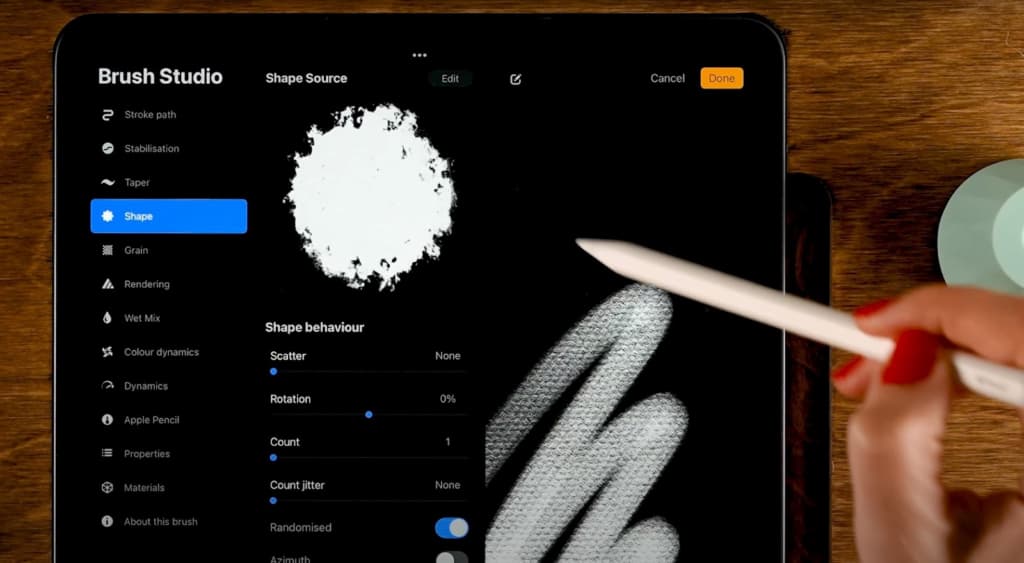
- Sketch or choose an image that will act as the backbone of your shape source;
- Modify the instrument configurations to metamorphose your shape into a precise stamp.
The Pixel Brush: Bit-rendered tools facilitate pixel-based art, dispensing crisp, square-edged strokes. In orchestrating a bit-rendered tool:
- Ignite the creation procedure by outlining a new drawing instrument;
- Navigate to the ‘Shape Source’ configurations and earmark ‘Square’ as your choice;
- Boost the ‘Spacing’ in the Stroke Path to ensure distinct pixels.
Acquiring proficiency in these tools amplifies your artistic repertoire, breathing new life into your artistic endeavors.
Expert Advice: While sculpting impression tools, lean towards minimalist, uncluttered shapes to augment the impression effect. Also, consider the resolution. Higher-resolution stamps can provide greater detail but may also use more processing power, so it’s essential to balance quality with performance.
Similarly, when developing bit-rendered tools, remember to adjust the ‘Jitter’ parameter under ‘Stroke Path.’ Lower jitter levels will result in cleaner, more precise pixel shapes.
Moreover, Procreate also allows you to import custom shapes and grains for your tools. This feature opens up limitless possibilities for creativity, so don’t hesitate to explore it. Whether you use an image you’ve created yourself or import textures from outside sources, you have an opportunity to make truly unique and personalized tools.
Ultimately, as you continue to experiment with these techniques, you’ll find your style evolving along with your tools. Embrace this evolution – it’s a sign of your growth and development as an artist. With time, patience, and practice, you’ll be able to create a collection of custom tools that perfectly complement your artistic vision.
Transforming an Image into a Brush in Procreate
Procreate fosters a creative synergy between the physical world and digital artistry by transforming ordinary images into extraordinary drawing tools.
Here’s a pathway to metamorphose a photo into a unique brush:
- Handpick an image that resonates with your creative instinct and convert it to a monochromatic palette, ensuring a seamless transition into your drawing tool;
- Transport this processed image into Procreate, employing it as the foundation for your tool shape or grain source;
- Refine the tool configuration, curating the intensity of the image’s influence on your strokes.
This process of weaving imagery into drawing tools imparts a layer of authentic texture to your digital illustrations, harmonizing the magic of tangible reality with digital creativity.
Professional Pointer: Images exhibiting dynamic contrast often birth striking drawing tools. Harness the power of image processing software to escalate the contrast of your chosen image prior to its migration into Procreate.
Additionally, bear in mind the image’s scale. A larger image will grant you more details to work with, but it will also require more processing power from your device. Therefore, it’s essential to strike a balance between detail and performance.
As an advanced step, consider utilizing Procreate’s Color Dynamics settings. This feature can apply the color data from the original image to your strokes, adding an extra level of depth and realism to your creations. Experiment with the Hue, Saturation, Brightness, and Secondary Color settings to fine-tune the color dynamics of your new brush.
Transforming images into drawing tools in Procreate can be a delightful journey of discovery and creativity. Each image holds unique potential to redefine your strokes and add a fresh twist to your digital artwork. Harness this opportunity and let your creativity soar.
Amplifying the Craft of Custom Drawing Tool Design: Expert Guidelines and Suggestions
Delving deeper into the realm of tool design, we offer expert guidelines and suggestions to augment your personalized tool ensemble within Procreate:
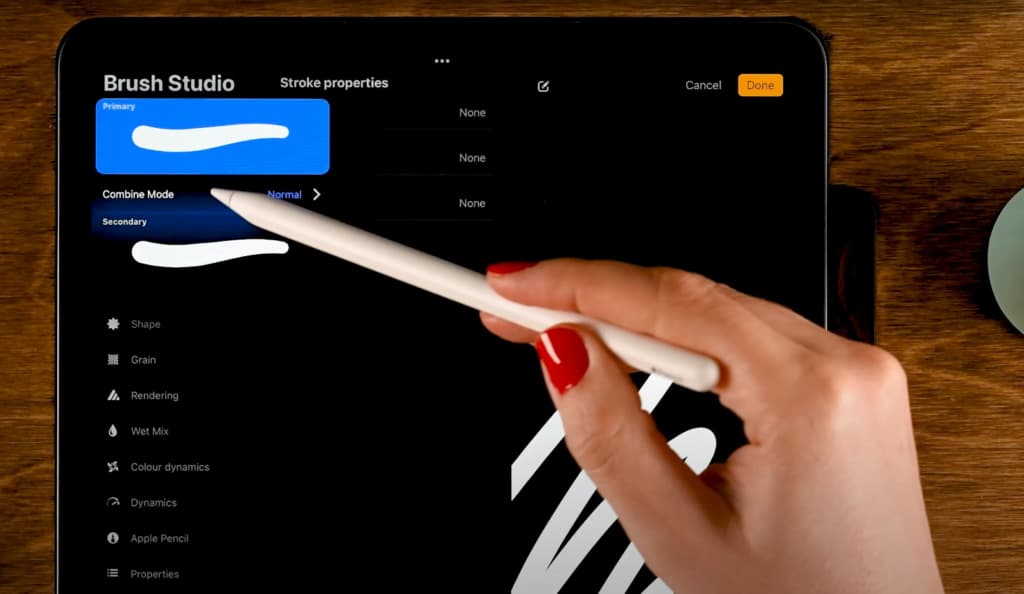
- Play with Mix Modes: Procreate harbors an assortment of mix modes, dictating the manner in which your tool interacts with pre-existing colors on your digital canvas. Engage with these mix modes to unearth astonishing and unforeseen artistic outcomes;
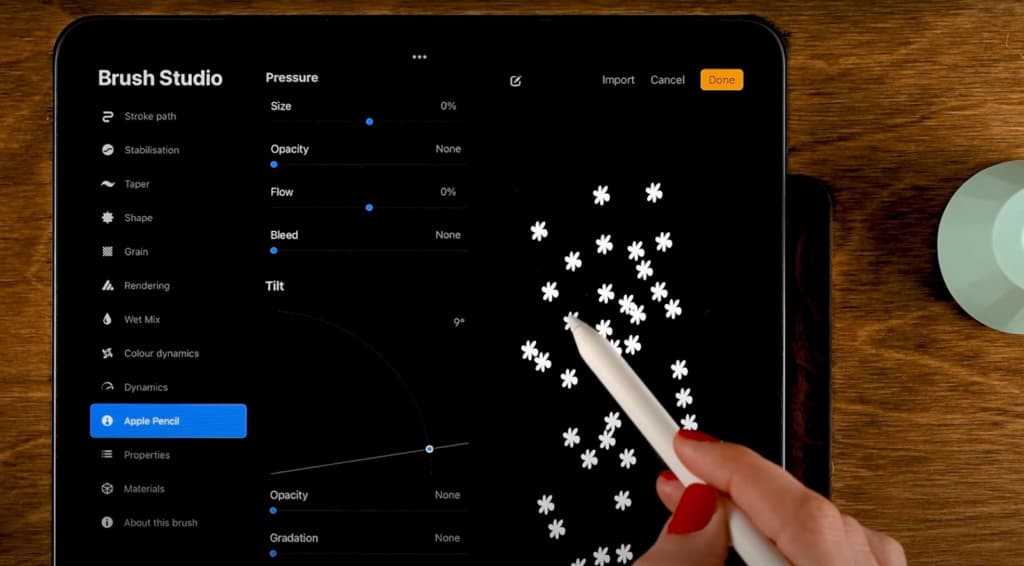
- Tailor Pressure and Inclination Sensitivity: If you are using an Apple Pencil, the ability to alter the sensitivity of your tool to pressure and inclination significantly enhances the feeling of a natural drawing experience;
- Preserve and Circulate Your Tools: After fine-tuning a drawing tool that encapsulates your artistic vision, ensure to store it safely. Additionally, consider sharing your unique tools with the Procreate community, encouraging collective growth and artistic exchange.
Hone these tactics while fostering an exploratory spirit, and you’re well-equipped to fabricate dynamic, personalized tools in Procreate, navigating your digital artwork toward pioneering terrains!
As you continue to experiment and refine your techniques, remember that the effectiveness of a tool doesn’t solely rely on its settings. Consider the medium you’re emulating, the size of your canvas, and even the resolution of your project. Each of these aspects can impact how your tool behaves and interacts with your work.
Moreover, remember that there is no absolute right or wrong in the realm of custom drawing tool design. What may work perfectly for one artist or one piece may not be as effective for another. So, keep an open mind, be receptive to adjustments, and most importantly, enjoy the process. The creative journey is as rewarding as the artwork you produce.
Manifesting Conventional Art Techniques Using Procreate’s Creative Instruments
Procreate serves as more than a platform for digital creativity—it’s a medium for bringing classical art methods into the digital domain. Leveraging Procreate’s robust and adaptable creative instrument engine, artists can emulate the aesthetics and tactility of conventional art equipment like sketching pencils, charcoals, watercolor paintbrushes, and oil paints, transforming the virtual canvas into an infinite playground of artistic potential.
Crafting a Digital Sketching Pencil:
- Jumpstart the procedure by conjuring a new creative tool;
- Opt for a source form and texture that accurately reflects the grain of graphite;
- Refine the dynamics of size and transparency to mirror the pressure responsiveness inherent to a genuine sketching pencil;
- Explore tilt configurations to mirror the subtle effect of gradation with a pencil’s broader edge.
By simulating the operation of traditional art instruments through meticulous adjustments in your creative instrument settings, you confer a palpable and relatable quality to your digital artwork, amalgamating the advantages of both artistic domains.
Resembling a Paintbrush:
- Initiate by creating a new drawing tool;
- Choose a shape source and grain that mimic the stroke of a paintbrush;
- Adjust the size and opacity parameters to reflect the dynamic application of a real paintbrush;
- Experiment with wet mix and rendering options to achieve realistic paint distribution and blending.
Taking inspiration from the behavior of physical painting tools and carefully fine-tuning your instrument settings, you can incorporate an authentic and intuitive painting experience into your digital artwork, embracing the full scope of artistic expressions.
Tailoring Procreate Artistic Implements for Distinctive Art Styles
Every artistic style necessitates a unique set of tools. For example, comic art might demand an implement that provides sharp, precise line work, while a more painterly technique could benefit from an instrument offering the feel of broad, textured brush strokes. Procreate’s flexible creative instrument engine enables you to construct implements that are customized to specific artistic styles.
Creating an Implement for Comic Art:
- Set the process in motion by formulating a new tool;
- Choose a shape source that provides a crisp, distinct edge;
- Adjust the size parameters to yield both thick and thin lines that respond to pressure sensitivity;
- Play around with taper configurations to establish strokes that start and end sharply, reflecting the aesthetic of traditional inkwork.
Expert Suggestion: Organize your style-specific creative implements into a distinct set for effortless access when you’re engaged in corresponding projects.
Crafting an Implement for Impressionist Art:
- Begin by designing a new artistic implement;
- Pick a source shape and grain that mimics the broad, visible brush strokes characteristic of Impressionist paintings;
- Tweak the opacity and size dynamics to reproduce the variable stroke thickness and transparency common in this art style;
- Try out different blending modes to achieve the layered color effect often seen in Impressionist works.
By consciously understanding the tool requirements of different art genres and tweaking your instrument settings accordingly, you can elevate the authenticity and appeal of your artwork in Procreate.
Navigating the Landscape of Procreate’s Inbuilt Brushes
While forging your personalized artistic instruments in Procreate leads to exciting explorations in creativity, the preset instruments that come bundled with Procreate should not be underestimated. These implements, carefully designed by professionals, span across a variety of art styles and mediums.
Getting acquainted with these brushes, and adjusting them to align with your unique artistic vision, can provide a solid understanding of the capabilities of Procreate’s implement engine.
Delving into and Tailoring a Default Brush:
- Launch the implementing library and handpick a default instrument that resonates with your artistic style;
- Try out the selected instrument on your canvas to gain a feel of its distinctive characteristics;
- Plunge into the instrument settings and experiment with various tweaks. If the modifications don’t quite hit the mark, remember that you always have the option to revert to the instrument’s default settings.
Insider’s Insight: Use the default brushes as stepping stones for fashioning your personalized implements. You may unearth innovative combinations of settings that light up your creative ingenuity. It’s all about playful experimentation, gaining insight, and ultimately, creating an array of tools that perfectly complement your artistry.
Amplifying Realism with Light and Shadow Brushes in Procreate
In the vast canvas of Procreate, the interplay of light and shadow brings life to your artwork, carving out a third dimension on a two-dimensional plane. By wielding brushes designed for light and shadow effects, you can introduce an added level of depth and realism, mimicking the way light illuminates and shadows fall in the real world.
To truly capture the essence of light and shadow:
- During the formation of your new brush, consider the ‘Scattering’ settings in your drawing tool dynamics. This can help create a dispersed light effect, perfect for creating glimmers or sparkles;
- For shadows, explore the ‘Wet Mix’ options. This will provide your strokes with a blended edge, mirroring the diffused boundary of real shadows;
- Don’t overlook the ‘Opacity’ settings. Varying the transparency of your strokes can evoke the subtleties in the play of light and shadow;
- Mastering the dance of light and shadow in your drawing tool creation process will equip you with a powerful toolset to sculpt the mood, form, and spatial depth in your digital artwork.
Insider’s Tip: Experimenting with a dual-tone approach for shadows – combining a darker version of the object’s color with a touch of ambient color – can significantly enhance realism.
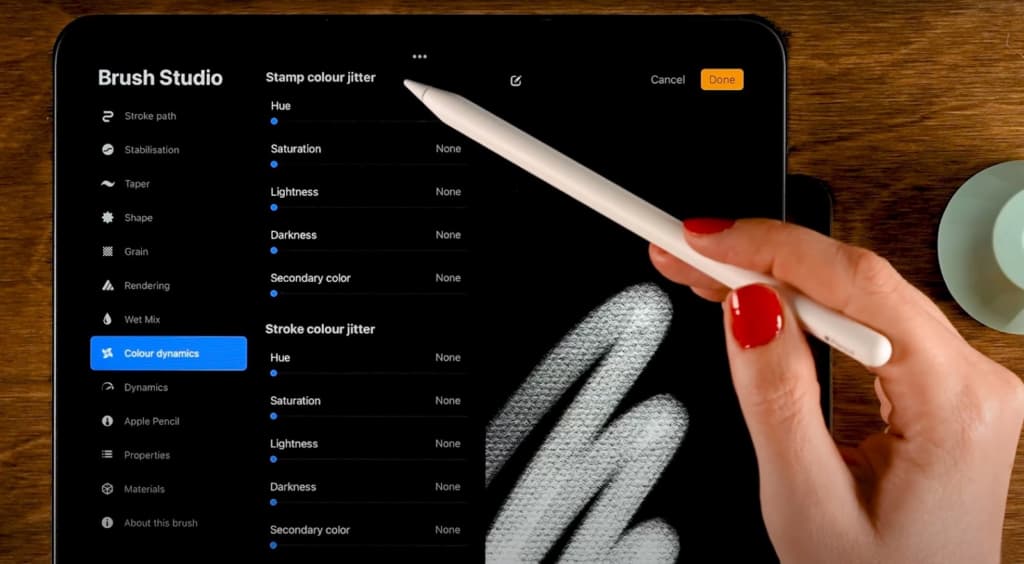
Harnessing the Power of Color Dynamics in Procreate Brushes
The language of colors is profound, conveying emotions and narratives that words often can’t. Procreate’s ‘Color Dynamics’ feature adds a new level of dynamism to this language, granting you the freedom to mold your strokes with multi-hued brilliance.
To get the most out of color in your brush strokes:
- Begin with understanding the role of each setting within ‘Color Dynamics’. While ‘Hue’ will cycle through different colors, ‘Saturation’ and ‘Lightness’ adjust the intensity and brightness respectively;
- For a brush that displays a rainbow of colors within a single stroke, set the ‘Hue’ jitter to a high percentage;
- Leverage the ‘Secondary Color’ option to introduce a complementary color into your stroke. This can simulate traditional techniques like bicolor blending;
- Remember, the magic of color dynamics lies in the balance. A symphony of colors can breathe life into your creations, but overdoing it may lead to visual chaos.
Insider’s Tip: Try linking color dynamics with brush size or stroke speed for interesting results. For example, a brush that changes hue with pressure variations can simulate the effects of a multicolor pencil.
Table of Key Takeaways
| Section | Insight |
|---|---|
| Custom Brush Creation in Procreate | Each custom artistic instrument in Procreate is a direct extension of your artistic flair, enabling you to dictate your digital art’s look and feel. |
| Settings in Procreate | Each setting within Procreate is a lever for the performance and appearance of your custom instruments, offering endless variations and styles. |
| Stamp and Pixel Brush Creation | Stamp and pixel instruments provide unique advantages, with stamp tools creating distinctive patterns and pixel tools enabling pixel art. |
| Image-to-Brush Transformation | Incorporating real-world images into your Procreate instruments infuses additional depth and realism into your digital artistry. |
| Advanced Creation Tips | Leveraging advanced techniques like blending modes and pressure sensitivity can elevate the versatility of your Procreate instrument arsenal. |
| Emulating Traditional Art Tools | Procreate allows you to mimic traditional art tools, offering a familiar and tactile experience in the digital sphere. |
| Genre-Specific Design | Procreate enables the creation of genre-specific artistic tools, ensuring that your digital art always hits the right note. |
| Exploring Procreate’s Inbuilt Drawing Tools | Understanding and modifying Procreate’s preset brushes can yield valuable insights into the platform’s capabilities, providing a solid foundation for your personalized creations. |
Conclusion
Procreate serves as an expansive and adaptable platform, offering digital artists the freedom to express their artistic inclinations in novel, exciting ways. Its advanced yet user-friendly brush engine presents artists with the tools to sculpt their unique artistic instruments, thereby unraveling an extensive range of possibilities to manifest their creative visions in the digital realm.
The journey of drawing tool creation in Procreate offers a labyrinth of exploration and learning opportunities. Sculpting bespoke brushes opens a world of personalization, allowing you to create tools that align perfectly with your artistic style. Moreover, Procreate offers the remarkable ability to transform everyday images into striking brush strokes, thereby integrating real-world textures and layers into your digital masterpiece.
The platform’s capacity for emulating traditional art mediums is yet another significant highlight. It allows the recreation of the look and feel of conventional art mediums such as pencils, charcoal, watercolors, and oil paint, thereby bringing a familiar and tactile quality to your digital artwork. This union of the traditional and the digital offers an enriched, hybrid art experience.
Advanced techniques further augment the digital art creation process. Exploring various blending modes and tailoring pressure sensitivity with tools like the Apple Pencil adds layers of complexity and versatility to your artwork. The process becomes a truly immersive and personalized experience, reminiscent of working with physical art mediums.
A standout feature of Procreate is its ability to create genre-specific drawing tools. Whether you’re a comic artist seeking a crisp line quality or a painter requiring the broad stroke of a brush, Procreate allows the creation of tools tailor-made to your needs. This versatility ensures that your artwork always strikes the right chord, irrespective of style or subject matter.
In essence, Procreate bridges the gap between physical and digital art, merging the quintessence of both worlds to present an unparalleled art platform. With persistent practice, unbridled exploration, and a discerning eye for detail, you can refine your skills, conquer the Procreate platform, and fabricate digital art that echoes your unique artistic identity.
To harness this potential is to unfurl the wings of your creativity, leading to an artistic flight of fancy that knows no boundaries. The future of digital art is in your hands – grab your stylus and let your creativity soar!