The Ultimate Guide to Cropping in Procreate
Procreate, known for its advanced features, and user-friendly design, has significantly impacted digital art creation. It offers an array of functionalities that serve both beginner and experienced artists. One critical feature is the ‘crop and resize’ tool, vital for enhancing composition and preparing works for different platforms or media. Despite its significance, it can be challenging for some users to grasp this tool’s usage fully. To help, we’ve designed this comprehensive guide on how to crop in Procreate effectively.
The User Interface
Understanding Procreate’s interface is essential for effectively using the app. The design of Procreate’s interface focuses on minimalism and functionality, providing a user-friendly experience. Let’s explore the various elements of the interface in detail.
Top Left Icons
At the top left of the screen, you’ll find a set of icons that offer quick access to important features:
| Title | Description |
|---|---|
| Gallery | This icon takes you back to the gallery, where all your artworks are stored. You can browse and organize your creations from this section. |
| Transform | The Transform arrow icon allows you to manipulate your canvas by moving, scaling, and rotating it. This feature helps you adjust and position your artwork precisely. |
| Adjustments | Represented by a magic wand icon, the Adjustments feature provides access to a variety of adjustment options. These options include adjusting the opacity, blur, noise, and other settings to fine-tune your artwork. |
| Brush | The brush icon opens a collection of different brushes available in Procreate. You can choose from a wide range of brushes to suit your artistic needs. |
| Eraser | This icon allows you to select the eraser tool. By tapping on it, you can access various eraser types to remove unwanted strokes or make corrections to your artwork. |
| Smudge | The smudge icon lets you smudge or blend colors on your canvas. It provides a tool for creating smooth transitions and softening edges. |
| Layers | The Layers icon represents a stack of paper sheets. Tapping on this icon opens the Layers panel, where you can manage and organize different layers in your artwork. Layers enable you to work on individual elements separately and make non-destructive edits. |
| Colors | This icon grants access to the color selection menu. Here, you can choose the color you want to use for painting, drawing, or any other creative tasks within Procreate. The color selection menu provides various color models and palettes to assist you in finding the perfect shades. |
Top Right Icons
- Slider: Located at the top right, the Slider allows you to adjust the brush size and opacity. By sliding your finger on this control, you can modify the size of your brush stroke and control its transparency;
- Actions: Represented by a wrench icon, the Actions feature provides additional tools and functions. One of the important tools found here is the ‘Crop and Resize’ tool. This tool allows you to crop or resize your canvas to specific dimensions, enabling you to focus on a particular area or adjust the overall composition of your artwork.
In addition to the icons mentioned above, Procreate’s interface also includes other elements like a canvas area, toolbar, and various gestures for navigation and interaction. The canvas area provides a blank space where you can create your artwork, while the toolbar contains additional tools and options that can be accessed by swiping up from the bottom of the screen.
Overall, Procreate’s interface combines simplicity with powerful features, offering artists and creators a comprehensive set of tools to bring their imagination to life. The intuitive layout and easy-to-use controls make it a popular choice among digital artists, illustrators, and designers.
Step-by-Step Guide on Cropping in Procreate
Procreate, an immensely popular digital art tool, offers a wide range of functionalities to edit your artwork, including the feature to crop and resize your images. This article will walk you through each step in detail, ensuring you get a precise understanding of how to effectively crop images using Procreate.
Step 1: Open Your Image in Procreate
The cropping journey in Procreate starts with opening your image in the app. To do this, locate the “+” button on the top right corner of your screen when you launch the application. This button takes you to a new interface where you can create a new canvas or import an existing image. To bring an image into Procreate:
- Tap the ‘+’ button to reveal a drop-down menu;
- From the menu, choose ‘Import’;
- You are now directed to your device’s file system. Navigate to the location of the image you want to crop;
- Select the image, and it will be automatically loaded into Procreate.
Now, your chosen image should be visible in your workspace.
Step 2: Accessing the Crop and Resize Tool
Now that you have your image open, you can access the cropping tool. Here’s how:
- Locate the ‘Actions’ button, represented by a wrench icon, on the top left corner of your screen.
- Tapping the ‘Actions’ button reveals a new menu with several tabs: Add, Canvas, Share, Video, Prefs, and Help.
- In these tabs, select the ‘Canvas’ tab. Under this tab, you’ll see a range of options related to manipulating your canvas. One of these options is ‘Crop and Resize.’
Upon tapping ‘Crop and Resize,’ a blue bounding box, the crop boundary, appears around your image.
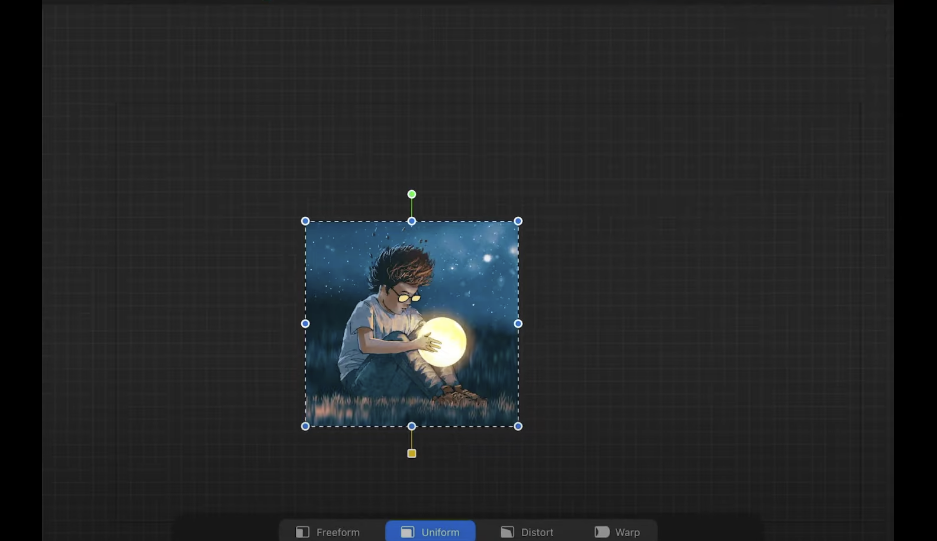
Step 3: Cropping Your Image
With the crop and resize tool open, you can now proceed to crop your image. The crop boundary, indicated by the blue bounding box, is adjustable to any size you prefer. The box has eight blue handles, each of which can be dragged to alter the crop area.
- The four handles located at the corners of the bounding box permit diagonal resizing. This action changes both the width and the height of your crop area simultaneously;
- The remaining four handles are located at the middle of each edge of the bounding box. Dragging these handles changes one dimension at a time: the top and bottom handles alter the height, while the left and right handles adjust the width.
The most crucial thing to remember here is that the crop boundary indicates the part of the image that remains after cropping. Therefore, make sure all the vital elements of your artwork are enclosed within the blue bounding box.
Step 4: Using the Uniform and Freeform Modes
Procreate offers two modes to refine your cropping – Uniform and Freeform. You’ll find these options at the bottom of your screen when you’re in the ‘Crop and Resize’ mode.
- Uniform Mode: In Uniform mode, the aspect ratio of your image (i.e., the proportion between its width and height) remains constant. This means that when you change one dimension, the other changes correspondingly to maintain the same ratio. This mode is beneficial when you want to preserve the original proportions of your image;
- Freeform Mode: The Freeform mode allows you to freely manipulate the width and height of your crop area independently. This means that changing one dimension doesn’t affect the other. This mode is perfect when you want to make unconventional crops or if the dimensions of your final image need to adhere to a specific requirement.
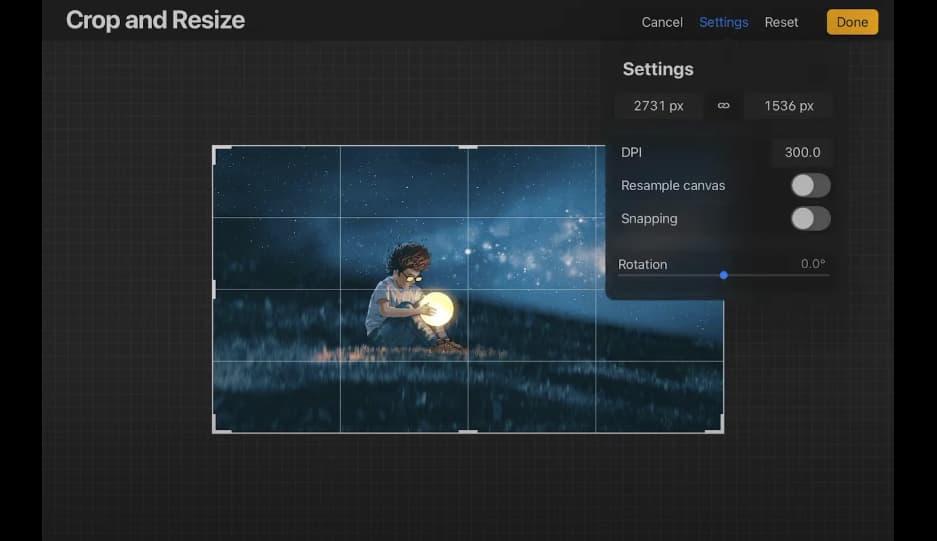
Step 5: Changing the Image Resolution
Procreate also allows you to change the resolution of your image while in the ‘Crop and Resize’ mode. The ‘Settings’ option is where you can adjust the resolution. Here’s how you can change the resolution of your image:
- Tap on ‘Settings’ present in the ‘Crop and Resize’ toolbar;
- A text box appears where you can input your desired resolution. Enter the desired resolution in pixels;
- After inputting the resolution, hit ‘Done’.
The resolution of an image refers to the number of pixels that compose the image on the screen. A higher resolution means a higher number of pixels, which results in more detail and a sharper image. Conversely, a lower resolution contains fewer pixels, and the image will appear less detailed and more pixelated.
Step 6: Applying the Crop
Once you’ve made all the necessary adjustments to your image, it’s time to apply the crop.
- To do this, find the ‘Done’ button located in the top right corner of your screen and tap on it;
- This action will crop your image according to the adjustments you made.
Remember that cropping is irreversible, so you must be sure of your crop area before hitting ‘Done.’ Once cropped, you can’t reclaim the parts of the image that were eliminated in the cropping process.
Table: Procreate Cropping Features Overview
| Feature | Purpose | Location |
|---|---|---|
| ‘Import’ Option | To import images into Procreate | ‘+’ Button |
| ‘Actions’ Button | To access different Procreate tools, including Crop and Resize | Top Left Corner |
| ‘Crop and Resize’ Tool | To change the dimensions of the image | ‘Actions’ Button -> ‘Canvas’ Tab |
| Blue Bounding Box | Indicates crop boundary | Appears on the image upon selecting ‘Crop and Resize’ |
| Uniform Mode | Maintains aspect ratio of the image | Bottom of screen in ‘Crop and Resize’ mode |
| Freeform Mode | Allows independent alteration of width and height | Bottom of screen in ‘Crop and Resize’ mode |
| ‘Settings’ Option | To adjust image resolution | In the ‘Crop and Resize’ toolbar |
Additional Tips and Techniques

In Procreate, cropping is more than just reducing an image’s size. The tool can also help you modify the image’s aspect ratio, change its resolution, or even switch from a portrait to a landscape orientation.
Modifying Aspect Ratio
In the ‘Crop and Resize’ settings, you’ll notice the ‘Settings’ tab in the lower left corner of your screen. Here, you can specify the exact dimensions you want for your image in terms of pixels, inches, or centimeters.
Changing the Resolution
Another impressive feature of Procreate’s crop tool is the ability to adjust the DPI (dots per inch) of your image. In the ‘Settings’ tab, next to the dimensions, there’s a box labeled ‘DPI’.
You can increase this value for print purposes or decrease it for digital display to manage the image file’s size. Remember, increasing the DPI may make the file size larger and potentially slow down Procreate, especially for large artworks.
Switching from Portrait to Landscape
Sometimes, you may want to change your artwork’s orientation. In such cases, swap the values of the width and height in the ‘Settings’ tab. The app will automatically adjust the image to fit the new orientation.
Uniform and Freeform Cropping
The app offers two ways to adjust the crop box: ‘Freeform’ and ‘Uniform’.
‘Freeform’ allows you to change the height and width independently of each other. This mode is useful when you don’t need to maintain the original aspect ratio.
‘Uniform,’ on the other hand, preserves the aspect ratio of the image. When you adjust one dimension, the other changes proportionately.
Conclusion
Understanding how to effectively use the crop tool in Procreate can greatly enhance your creative process. Beyond simply reducing image size, it offers opportunities to improve composition, adjust aspect ratios, and prepare your artwork for various platforms and media. With this guide, we hope you’re better equipped to fully utilize this versatile feature in your digital art journey.
FAQS
Yes, Procreate allows you to undo actions, including cropping. Simply tap with two fingers on the screen to undo. However, note that this only works in the same session. Once you close the app or your artwork, the undo history is cleared.
No, you cannot crop a specific layer. The ‘Crop and Resize’ tool applies to the entire artwork. If you need to adjust a specific layer, consider using the ‘Selection’ tool and ‘Transform’ tool to resize or reposition the content.
No, cropping doesn’t reduce image quality. However, increasing the DPI or canvas size during cropping can slow down the app due to the larger file size.